Integrations
Improveit360 Integration
Section titled “Improveit360 Integration”ArcSite Provides Out-of-the-Box Standard Integration for essential features. With Standard Integration, it supports auto-pushing Drawing PDFs, creating Sales data in I360 Appointments. No extra custom development is needed.
Standard Integration for I360
Section titled “Standard Integration for I360”Integrating I360 into ArcSite
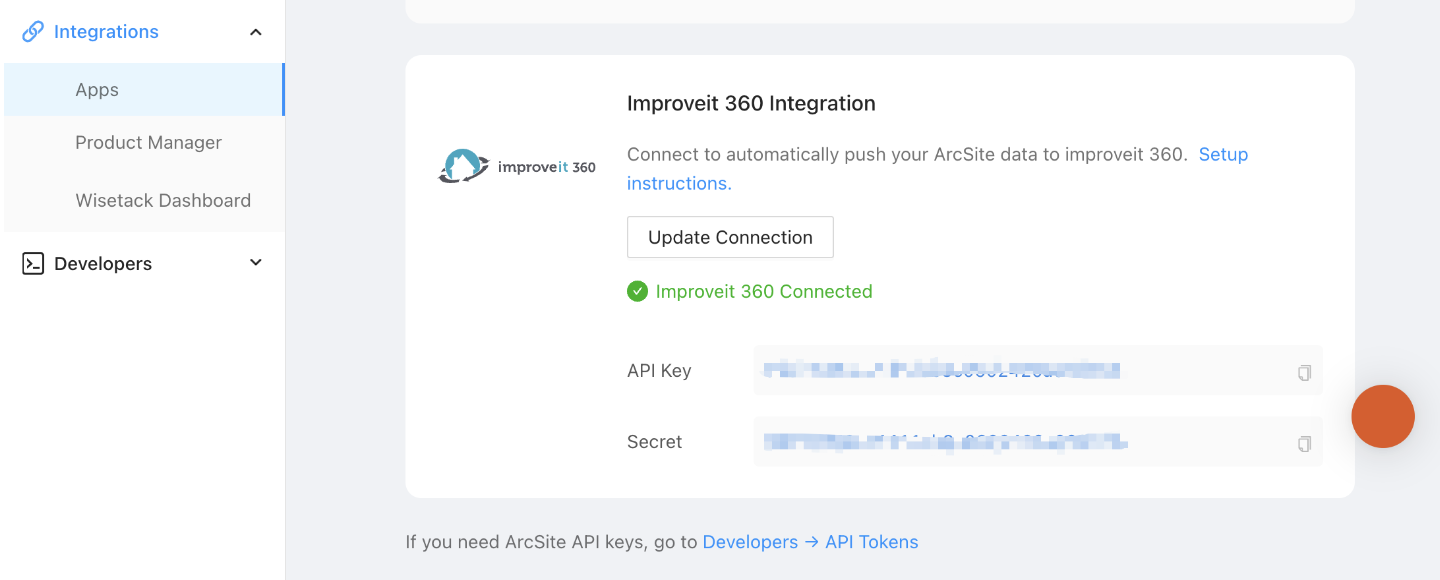
For detailed settings and connection methods, please consult the setup guide: I360 Integration Setup Part One - Customer Steps.
Associating I360 Appointments with ArcSite Projects
- Use the ArcSite Project Create API to generate an ArcSite project using information from an I360 appointment.
- Associate an I360 appointment with a specific ArcSite project through Associate I360 Appointment with ArcSite Project.
Validating the Integration
Section titled “Validating the Integration”Once you’ve successfully created the project and associated with the appointment, you can verify the integration status in ArcSite follow these steps:
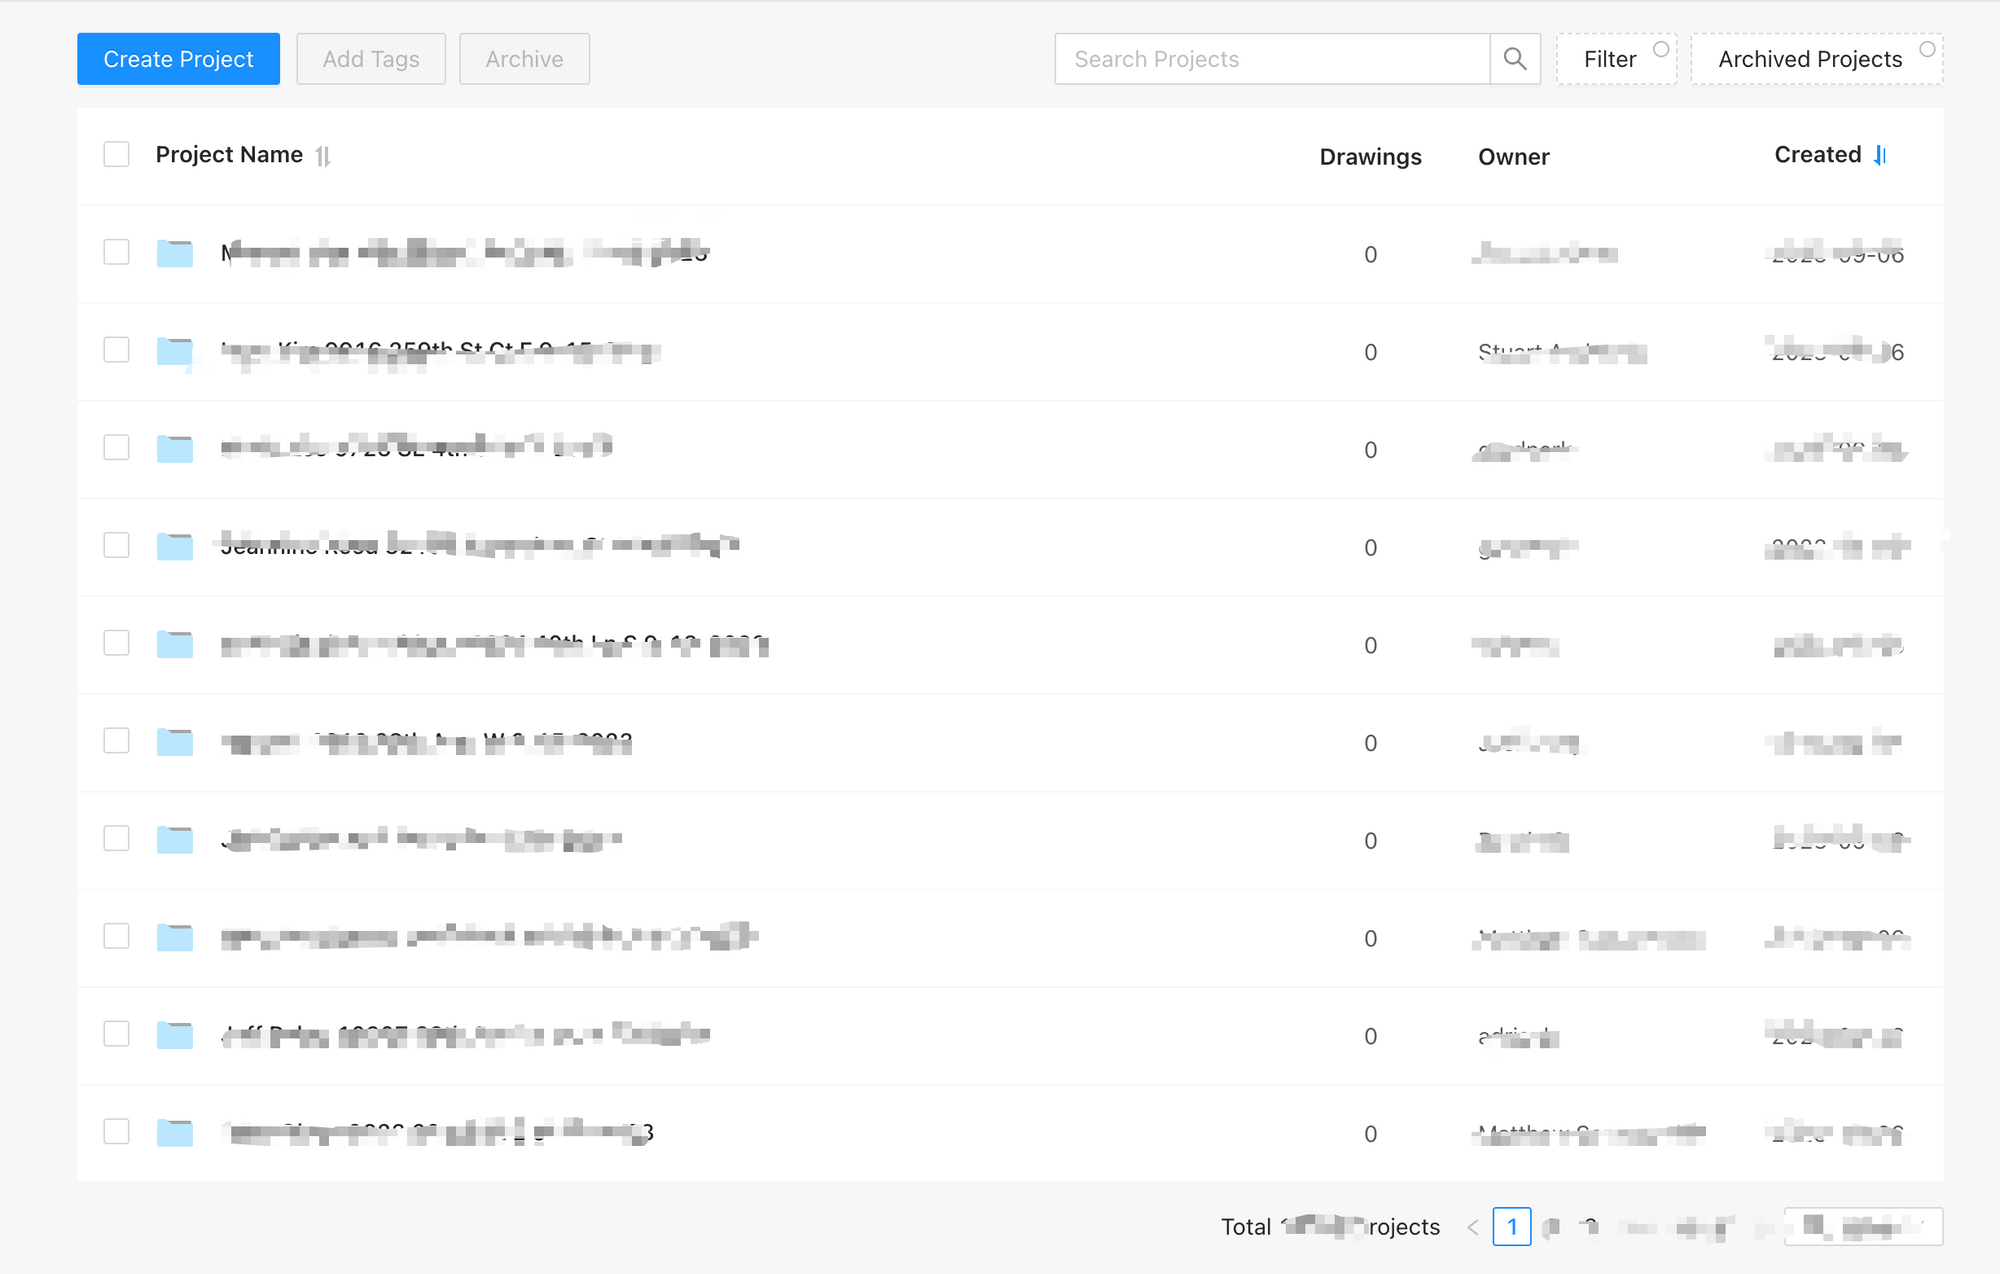
- Check if the project created via the API appears in the project List. If it’s missing, this indicates a project creation failure.
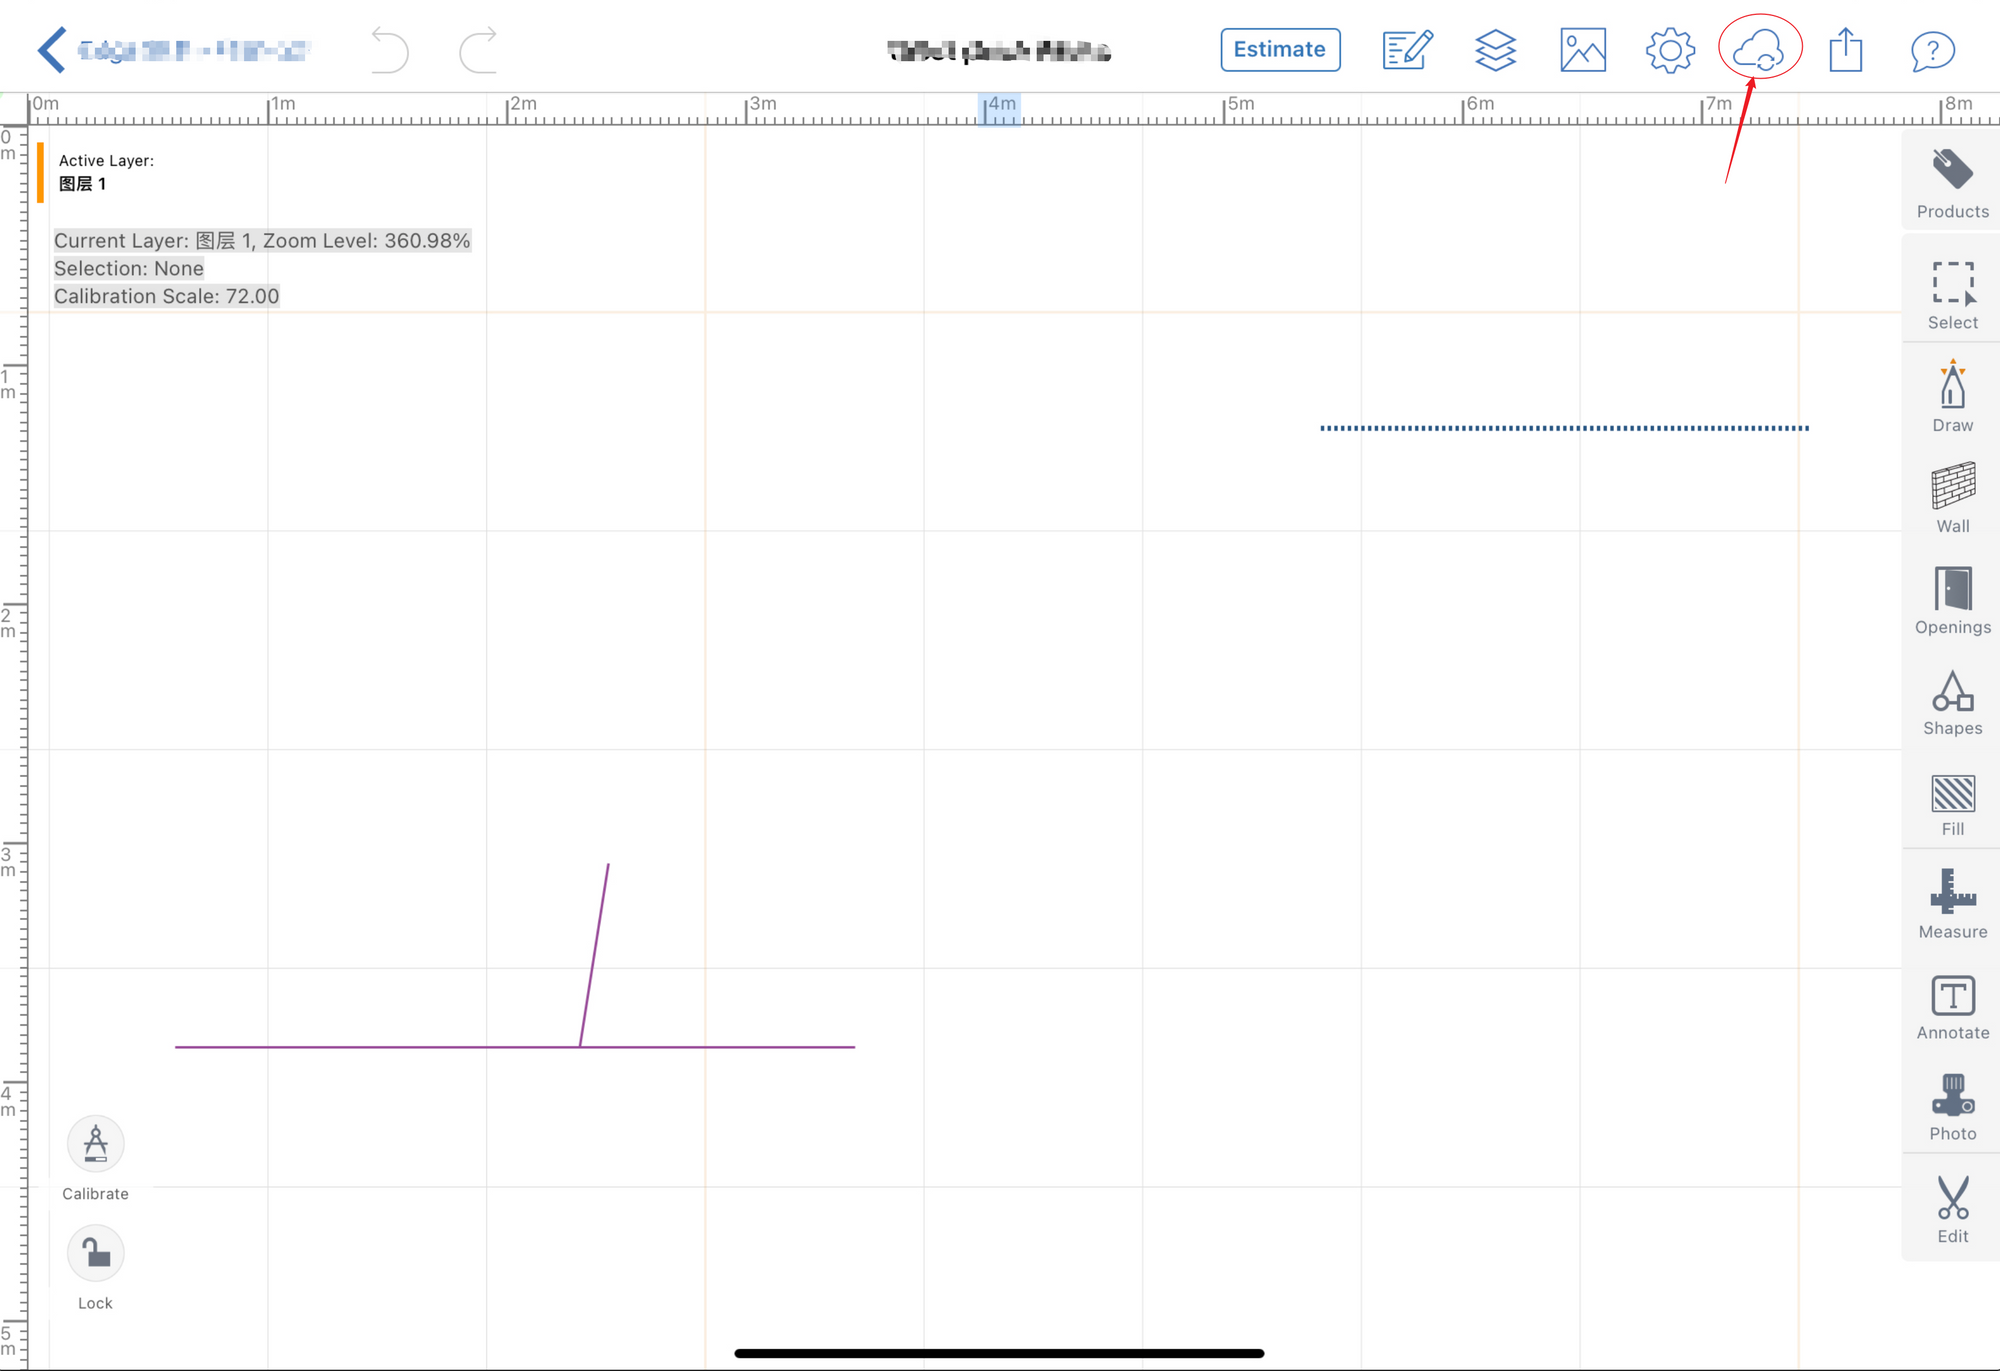
- Within the ArcSite app, create a drawing within the project and upload it to the Cloud.
- On the ArcSite user site, select the uploaded drawing.
- In the Takeoff & Estimate Tab, ensure the Send to I360 button is visible.
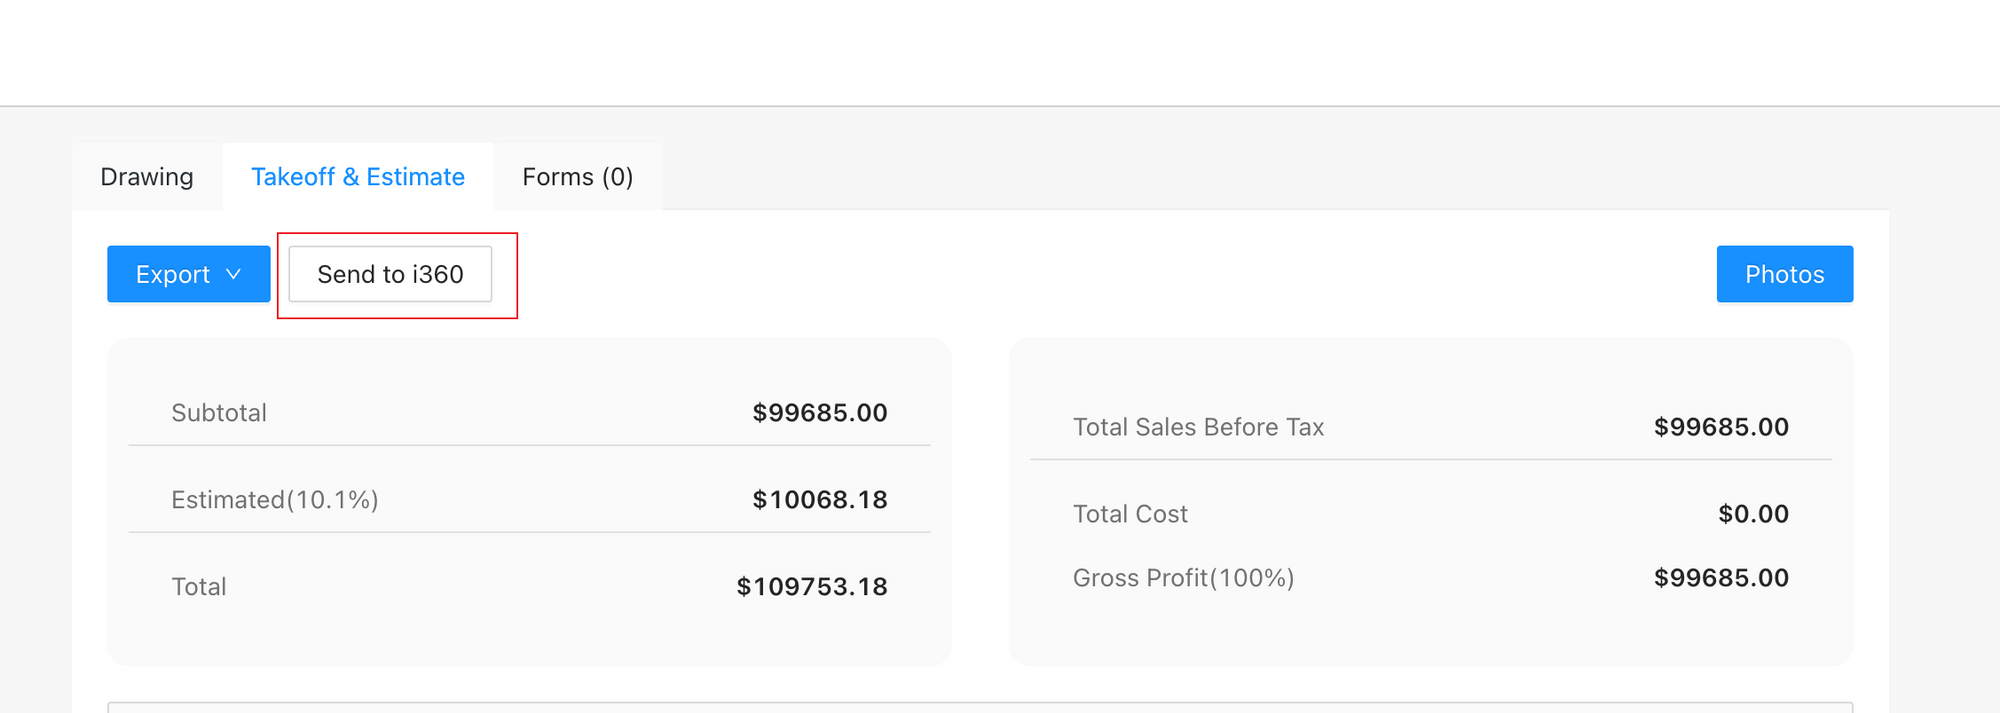
- If the Send to I360 button appears, it confirms the successful association, allowing the project to push data to associated i360 appointment. If the button is missing, this indicates a project association failure. Please check the associate API for more information.
Connecting Products between ArcSite and I360
Section titled “Connecting Products between ArcSite and I360”ArcSite supports the connection of one I360 product to an ArcSite product through the ArcSite Product Manager web page in user site. Once connected, this connection relationship will be used when ArcSite pushes Line Items data to I360.
To connect products, follow these steps:
- Verify that the I360 environment is correctly set up, and the product exists in both I360 and ArcSite.
- Navigate to
Integrations->Product Managerto locate the product you wish to connect.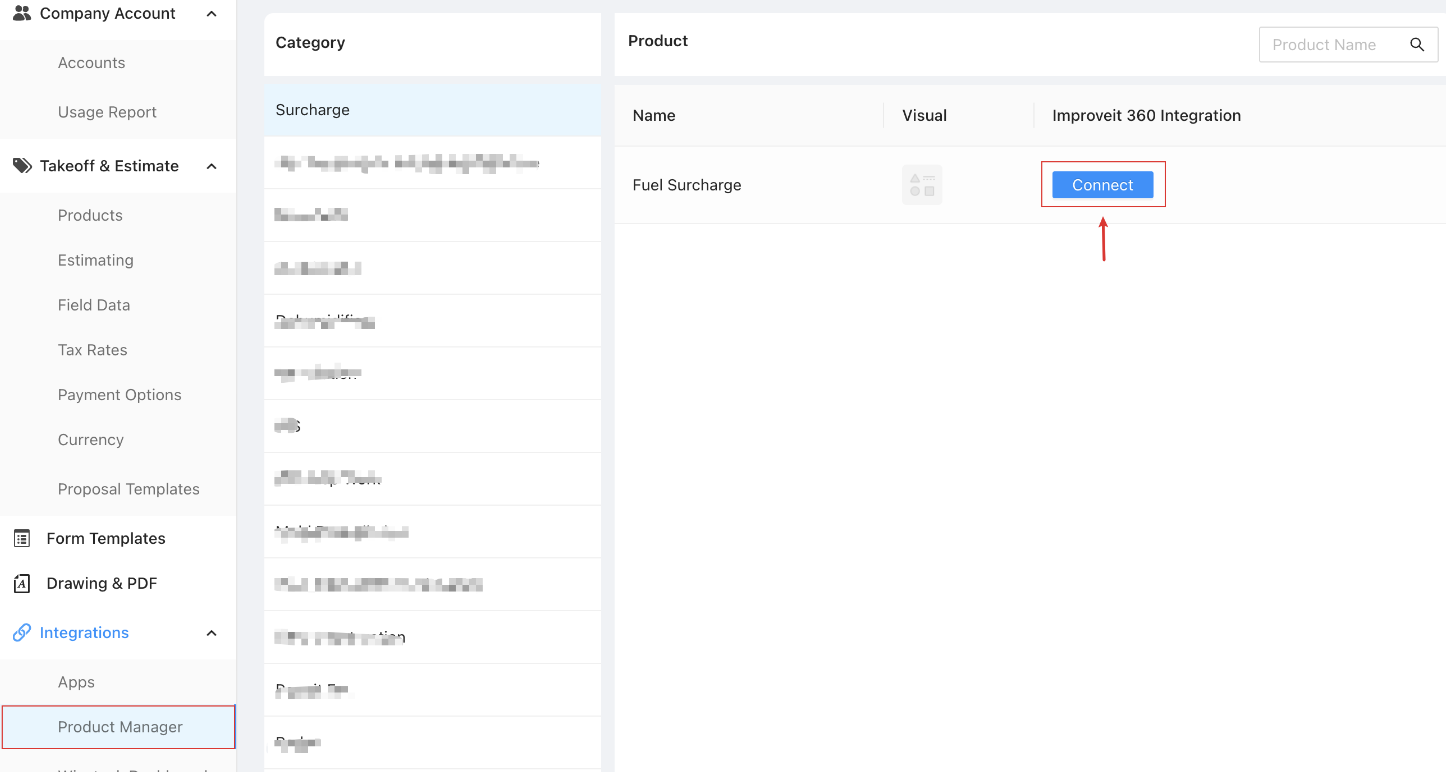
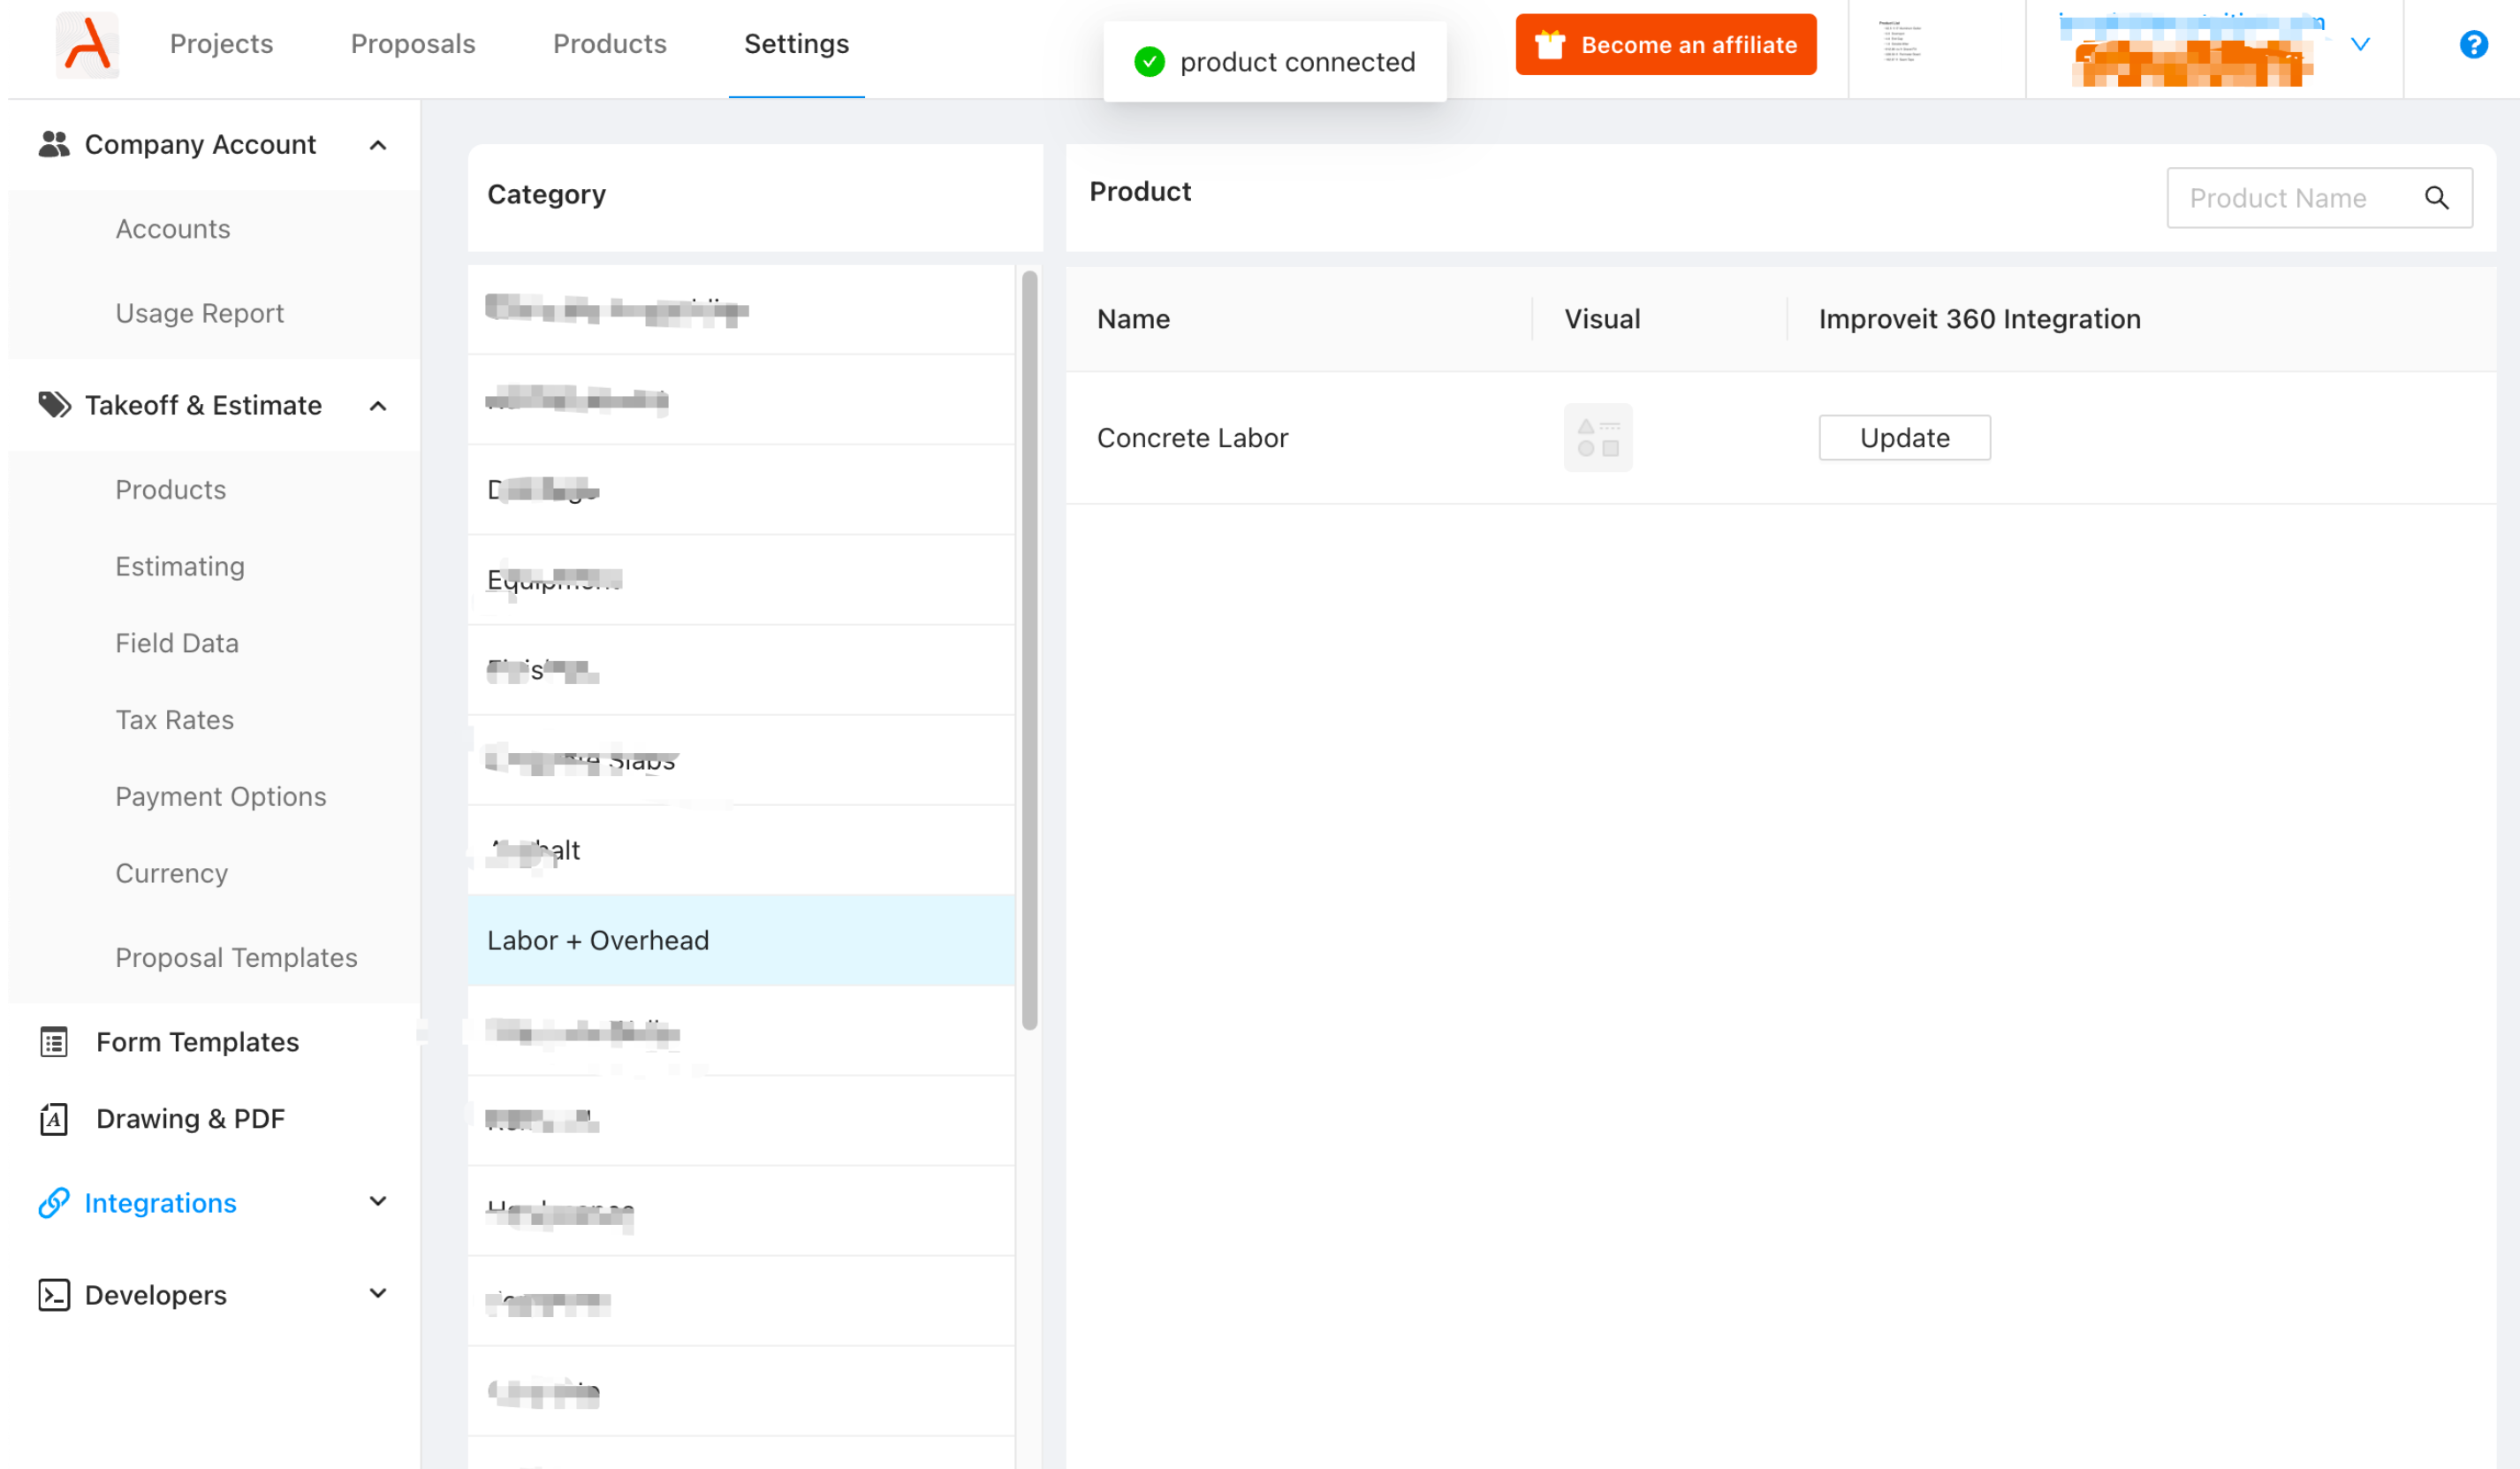
- Click the connect button and select the corresponding I360 product.
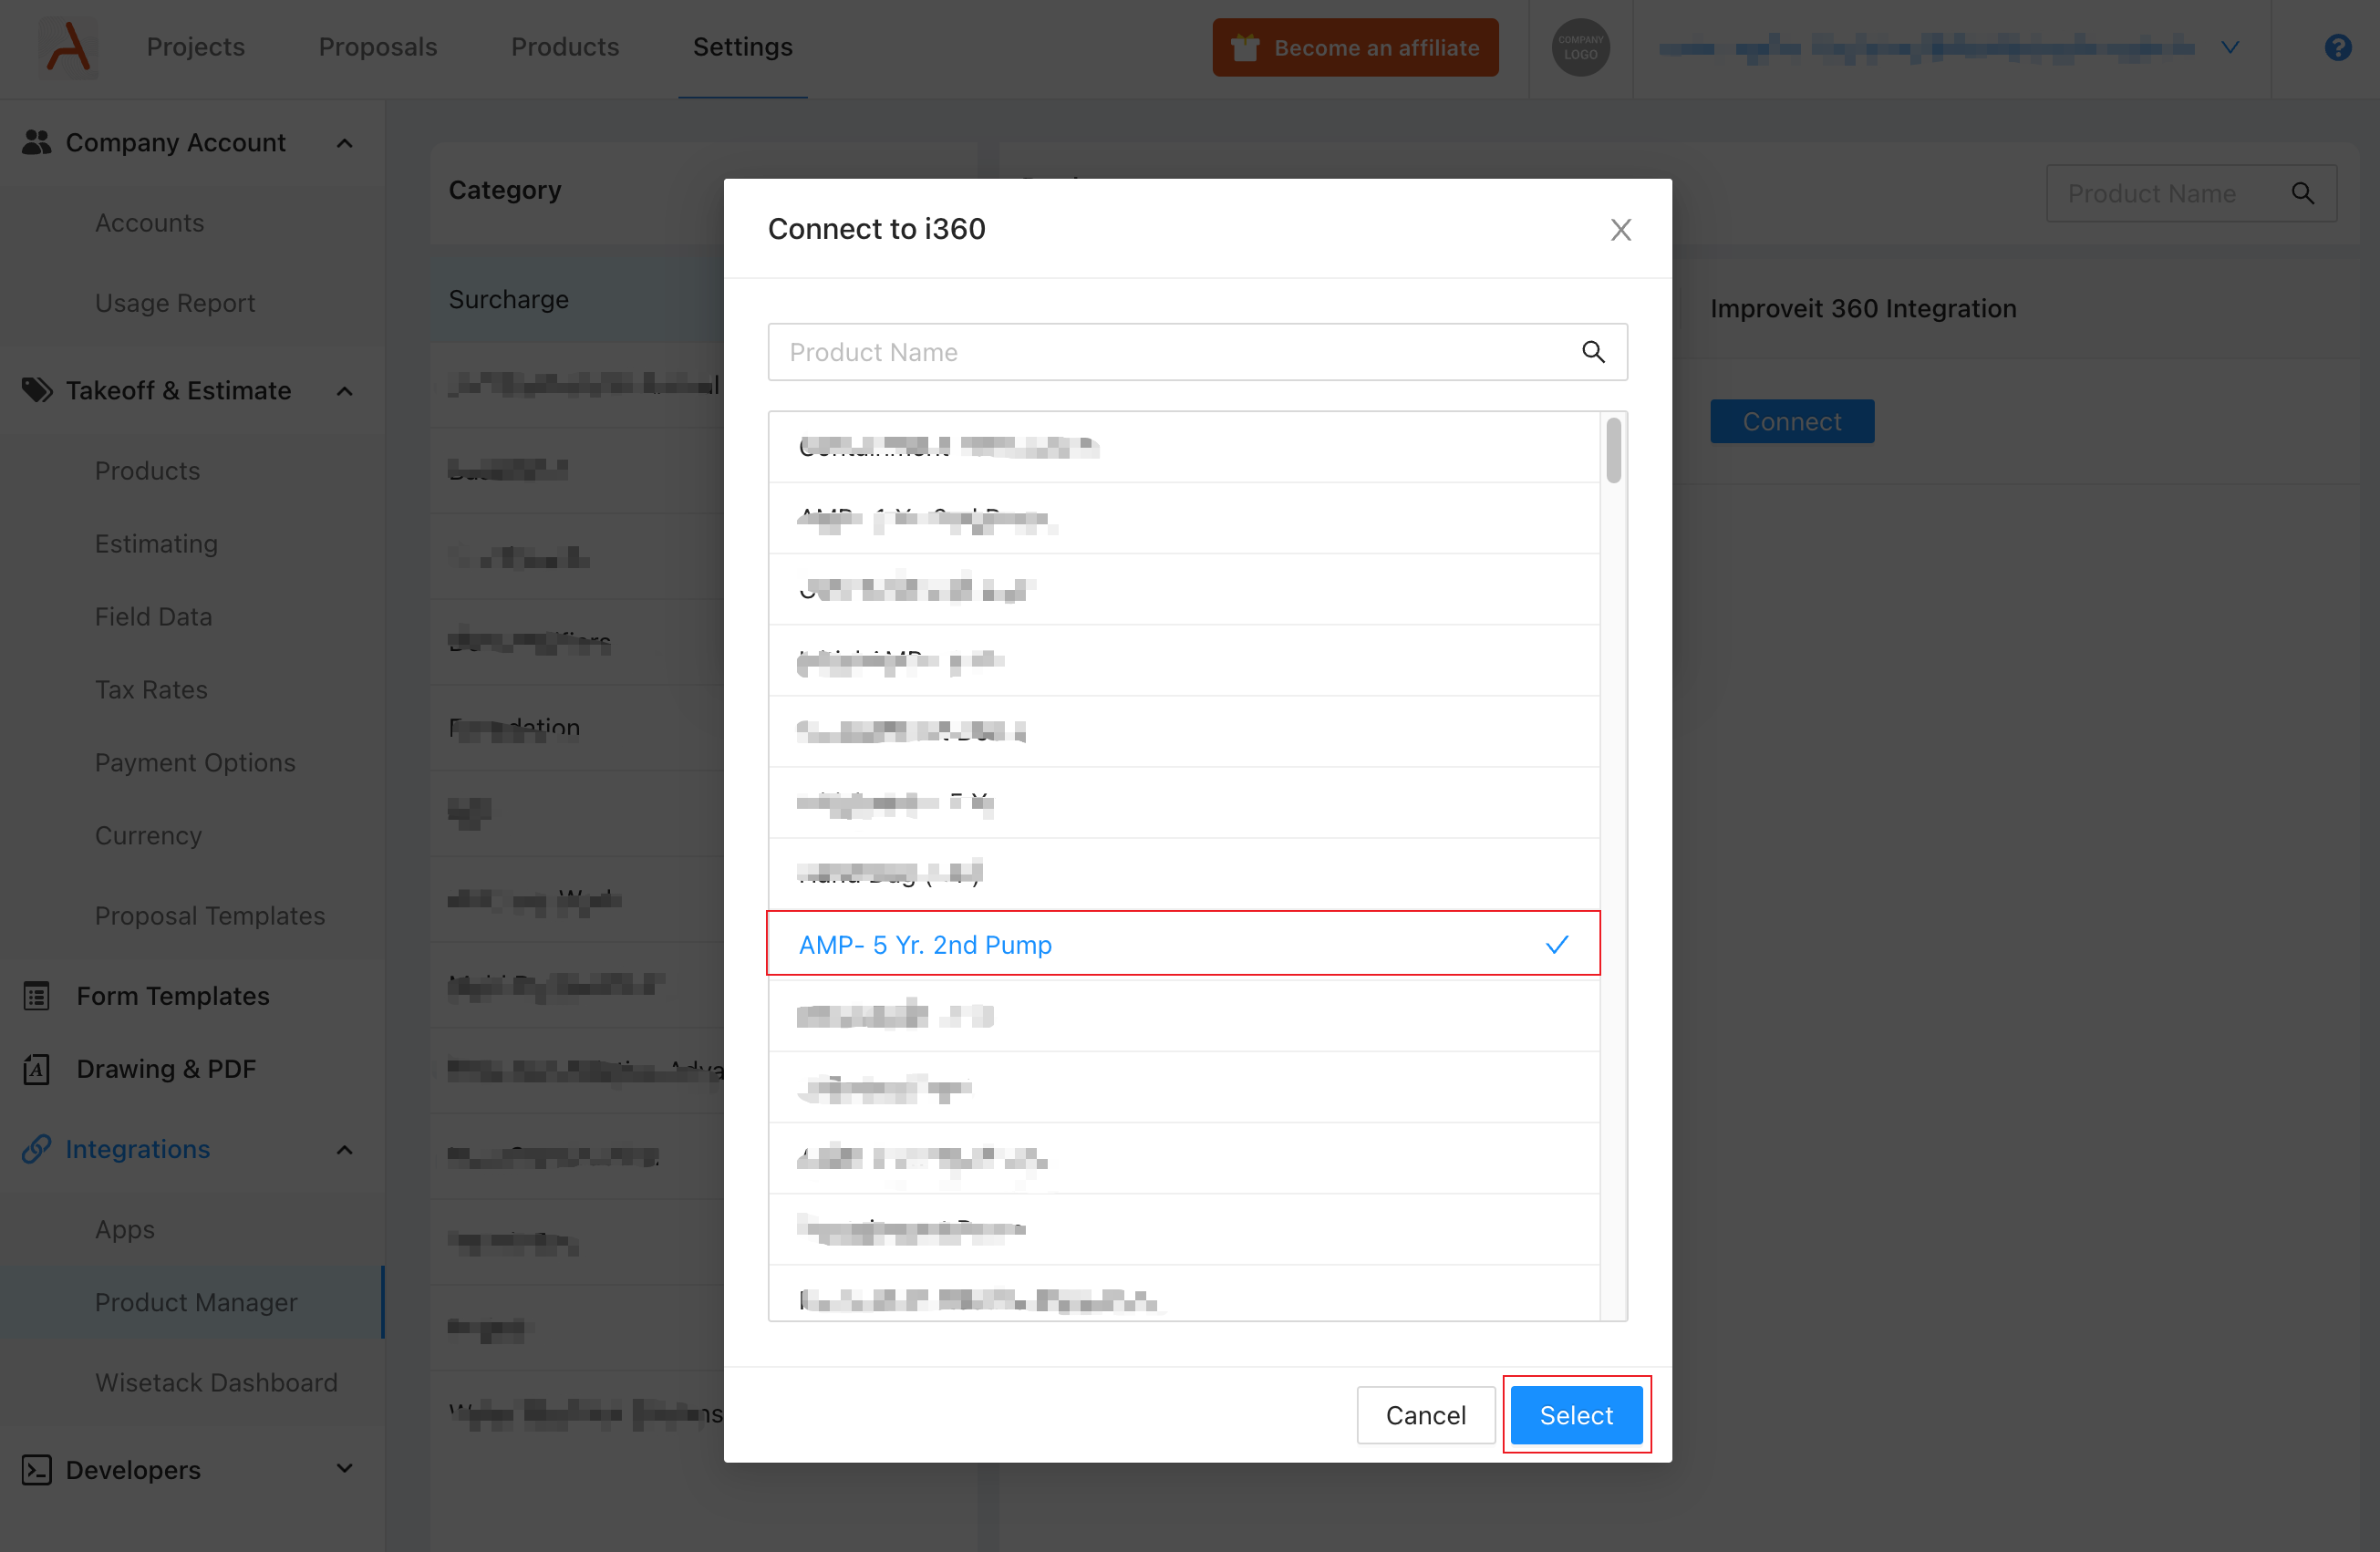
- After connecting, the product status changes to connected, and the Connect button becomes Update.
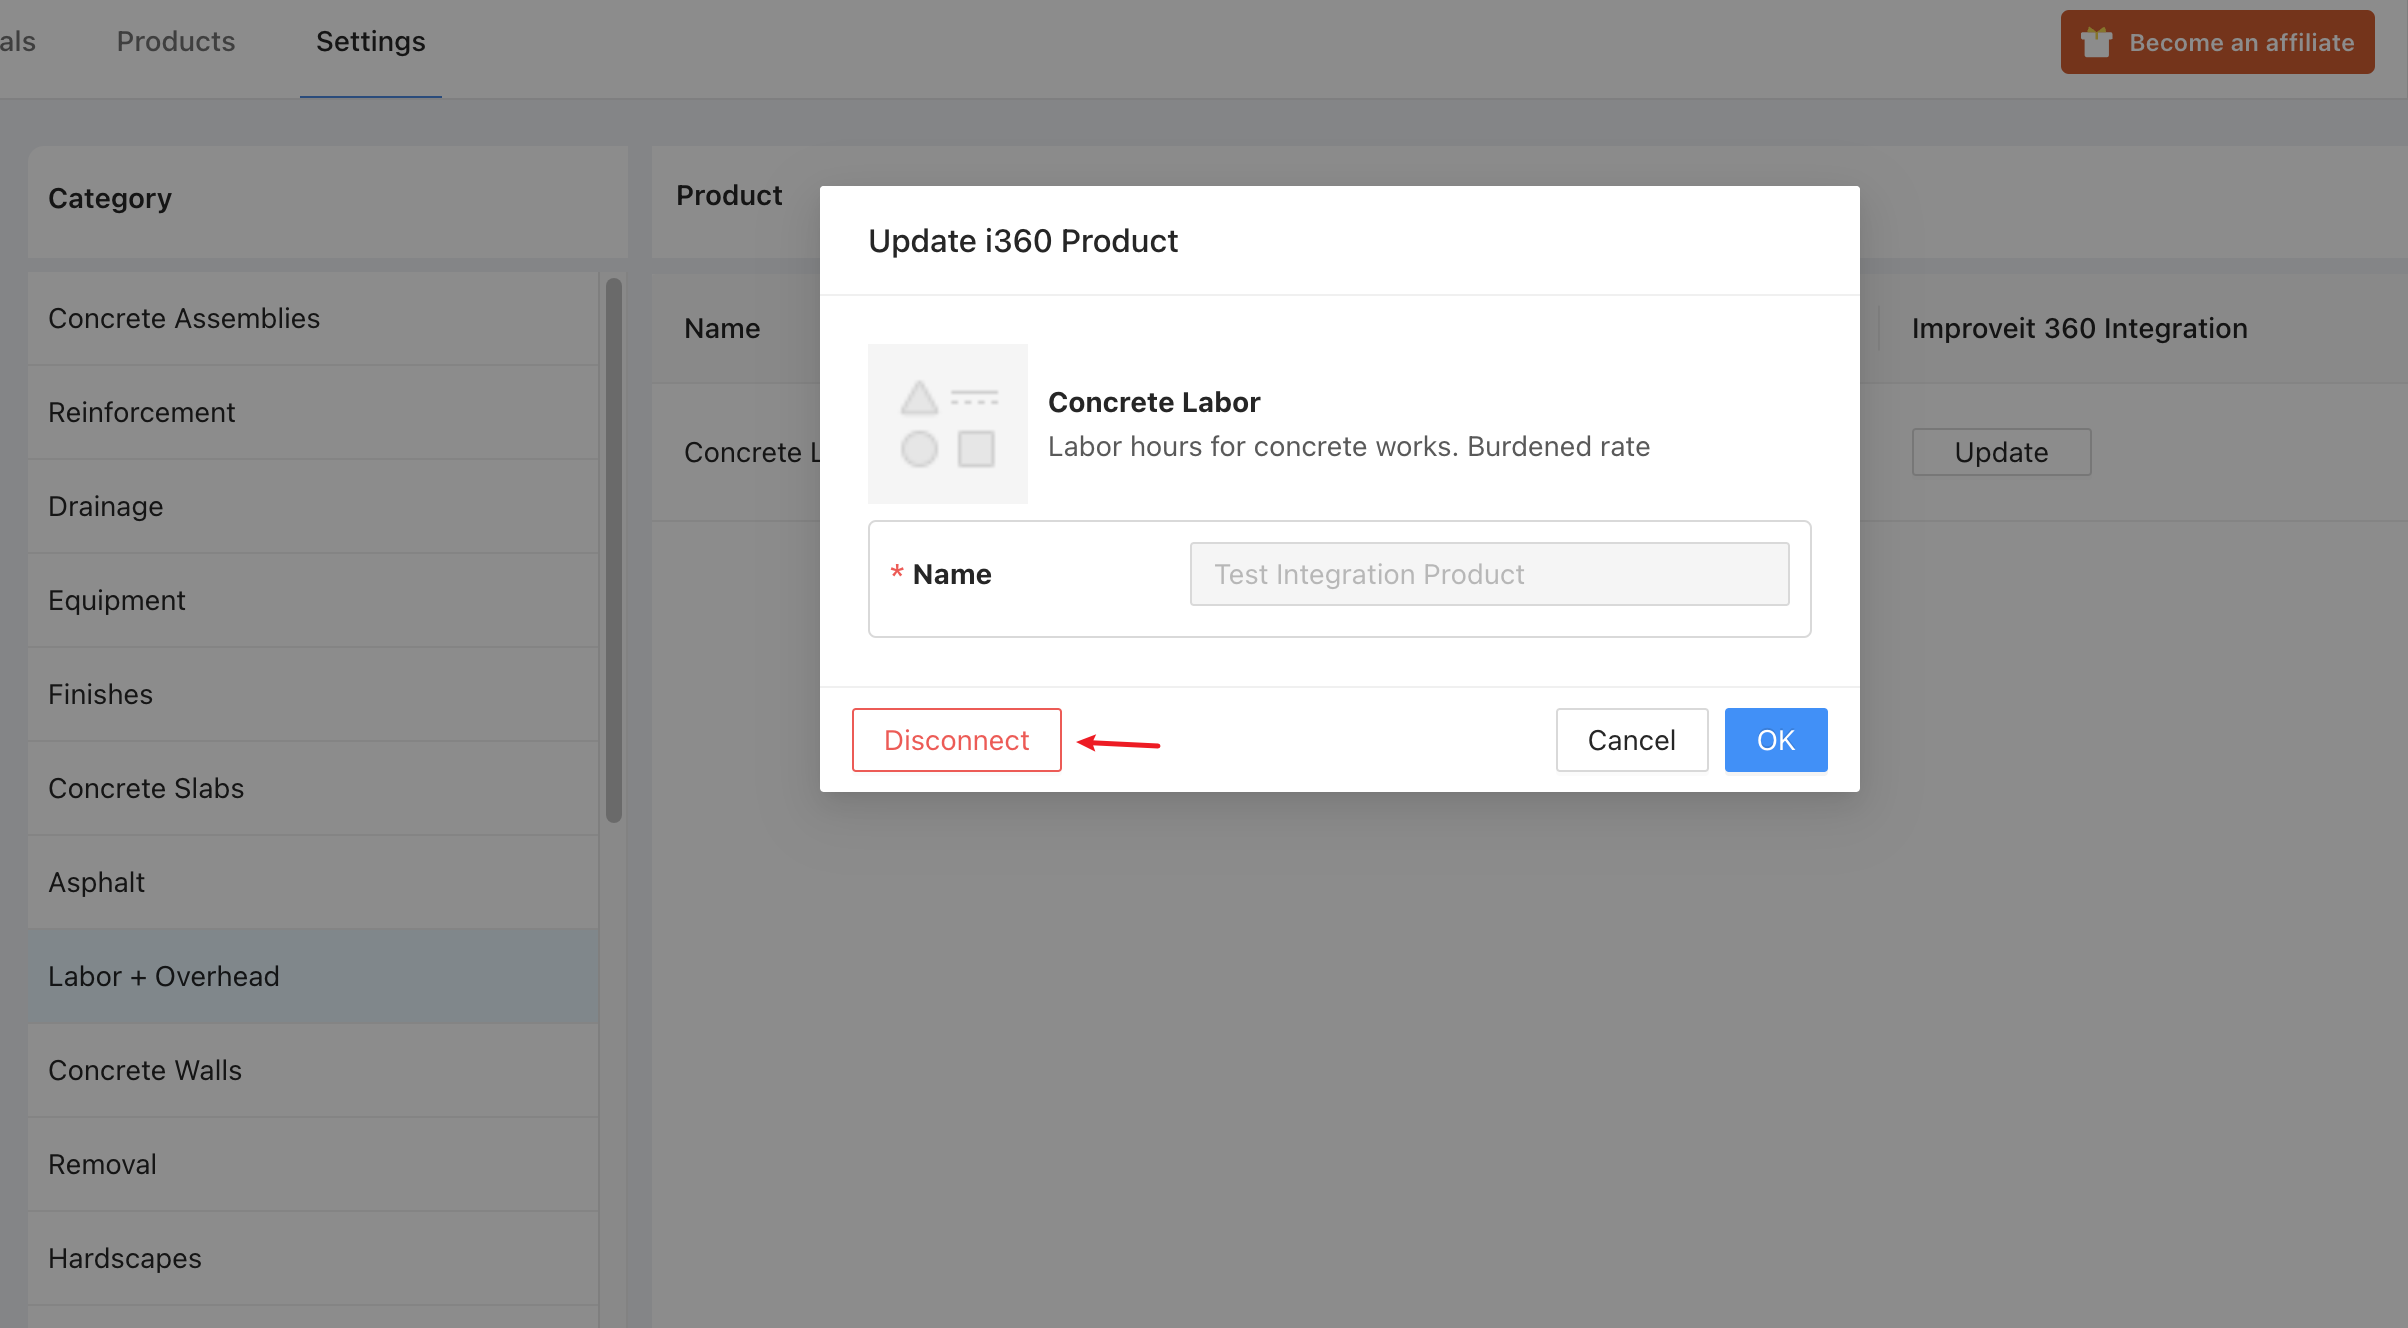
- If you wish to disconnect products, you can click Update, followed by the Disconnect button.
Data Pushing Details
Section titled “Data Pushing Details”We categorize data pushing into three types based on the data involved:
Automatic Push for Drawing PDF and Proposal PDFs
Section titled “Automatic Push for Drawing PDF and Proposal PDFs”-
When to Push:
 After user uploads data to ArcSite Cloud in the app, we will trigger out push to I360.
 -
How It Works: The latest Drawing PDFs are generated and automatically pushing to I360, replacing any existing files.
-
How to Verify: Check these files in the Attachments section of the associated I360 Appointment.
Manual Push for Proposal PDF
Section titled “Manual Push for Proposal PDF”- When to Push: Proposal PDF will be triggered:
- When user clicks the
Exportbutton in the app, aDo you want to push this proposal to I360?pop-up appears, if you select “Yes” it will trigger the push.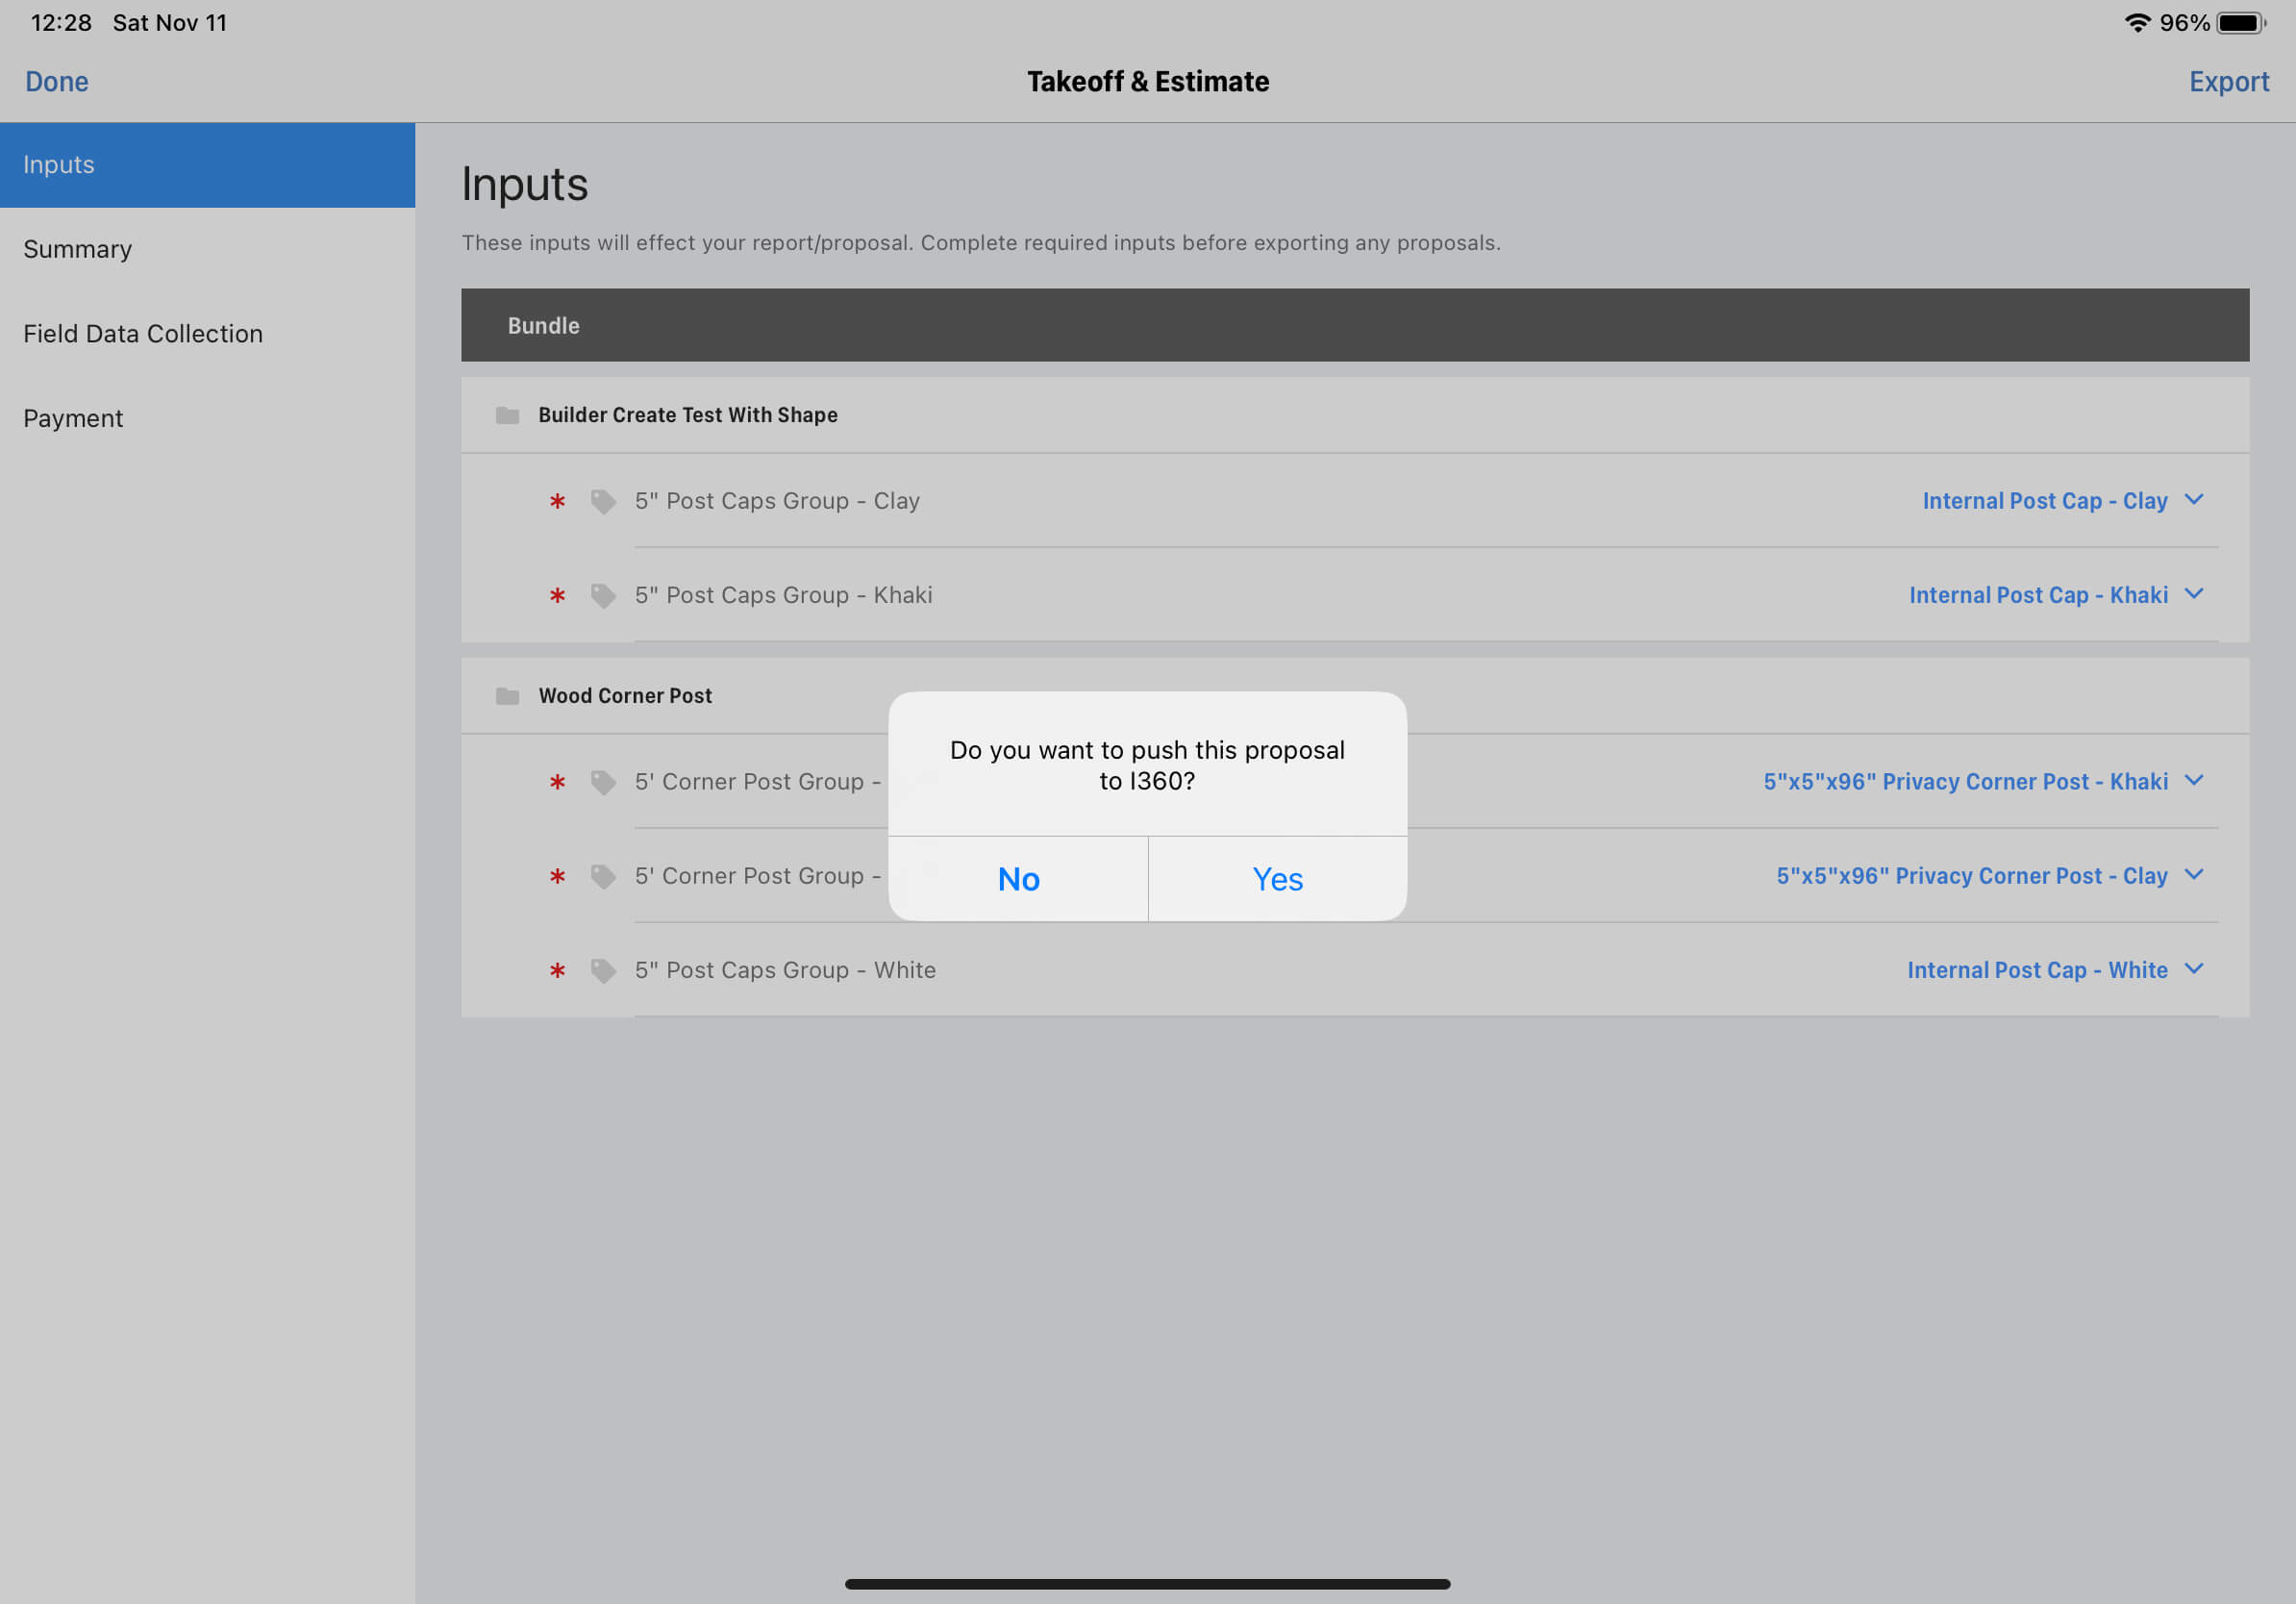
- When user clicks the
- How It Works: The proposal PDF is exported and pushing to I360, replacing any existing files.
- How to Verify: Check these files in the Attachments section of the associated I360 Appointment.
Manual Push for Line Items and Pricing
Section titled “Manual Push for Line Items and Pricing”-
When to push: Product line items and pricing will be triggered:
- When user clicks the
Exportbutton in the app, aDo you want to push this proposal to I360?pop-up appears, if you select “Yes” it will trigger the push. - Alternatively, click
Send to I360button in the Takeoff & Estimate Tab on the drawing detail page of the user site.
- When user clicks the
-
How It Works: ArcSite pushes the corresponding drawing line items data to Sales and Sales Items of the I360 appointment, and updates the status of appointment to
Soldthen. -
How to Verify: Check the Sales and Sales Items in the corresponding I360 Appointment.
APIs for I360
Section titled “APIs for I360”Associate I360 Appointment with ArcSite Project
Section titled “Associate I360 Appointment with ArcSite Project”curl -X POST 'https://api.arcsite.com/v1/i360/associate_project' \-H 'Authorization: Bearer your_api_token_here' \-H 'Content-Type: application/json' \-d '{ "appointment_id": "AXh09668400GJgk", "project_id": "36029621653386360"}'const response = await fetch("https://api.arcsite.com/v1/i360/associate_project", { method: "POST", headers: { Authorization: "Bearer your_api_token_here", "Content-Type": "application/json", }, body: JSON.stringify({ appointment_id: "AXh09668400GJgk", project_id: "36029621653386360", }),});const data = await response.json();import requests
response = requests.post( "https://api.arcsite.com/v1/i360/associate_project", headers={"Authorization": "Bearer your_api_token_here"}, json={ "appointment_id": "AXh09668400GJgk", "project_id": "36029621653386360", },)data = response.json(){ "id": "36029621653386360", "name": "nac", "created_at": "2022-01-16T03:31:39", "updated_at": "2022-01-16T03:31:39", "job_number": "heeloo", "customer": { "name": "hello", "phone": "122112", "second_phone": "122112", "email": "dev@arctuition.com", "second_email": "dev@arctuition.com", "address": { "street": "address", "city": "city", "county": "county", "state": "state", "zip_code": "200544" } }, "work_site_address": { "street": "street", "city": "city", "county": "county", "state": "state", "zip_code": "300433" }, "sales_rep": { "name": "Wang", "email": "dev@arctuition.com", "phone": "122112" }, "tags": ["tag1", "tag2"]}This endpoint establishes an association between an I360 appointment and an existing ArcSite project.
POST https://api.arcsite.com/v1/i360/associate_project
Parameters
Section titled “Parameters”| Parameter | Type | Description |
|---|---|---|
| appointment_id | String | (required) The ID of the appointment in I360. |
| project_id | String | (required) The ID of the existing ArcSite project. |
Batch associate I360 Appointment with ArcSite Project
Section titled “Batch associate I360 Appointment with ArcSite Project”curl -X POST 'https://api.arcsite.com/v1/i360/batch/associate_project' \-H 'Authorization: Bearer your_api_token_here' \-H 'Content-Type: application/json' \-d '{ "items": [ { "appointment_id": "AXh09668400GJgk", "project_id": "36029621653386360" }, { "appointment_id": "BXh09668400GJgk", "project_id": "36029621653386361" }, { "appointment_id": "CXh09668400GJgk", "project_id": "36029621653386362" } ]}'const response = await fetch("https://api.arcsite.com/v1/i360/batch/associate_project", { method: "POST", headers: { Authorization: "Bearer your_api_token_here", "Content-Type": "application/json", }, body: JSON.stringify({ items: [ { appointment_id: "AXh09668400GJgk", project_id: "36029621653386360", }, { appointment_id: "BXh09668400GJgk", project_id: "36029621653386361", }, { appointment_id: "CXh09668400GJgk", project_id: "36029621653386362", }, ], }),});const data = await response.json();import requests
response = requests.post( "https://api.arcsite.com/v1/i360/batch/associate_project", headers={"Authorization": "Bearer your_api_token_here"}, json={ "items": [ { "appointment_id": "AXh09668400GJgk", "project_id": "36029621653386360", }, { "appointment_id": "BXh09668400GJgk", "project_id": "36029621653386361", }, { "appointment_id": "CXh09668400GJgk", "project_id": "36029621653386362", }, ], },)data = response.json(){"success_items": [ "appointment_id": "AXh09668400GJgk", "project_id": "36029621653386360"
],"fail_items": [ "appointment_id": "BXh09668400GJgk", "project_id": "36029621653386361", "message": "The project is already associated with an i360 Appointment"]}This endpoint establishes multiple associations between I360 appointments and existing ArcSite projects.
POST https://api.arcsite.com/v1/i360/batch/associate_project
Parameters
Section titled “Parameters”| Parameter | Type | Description |
|---|---|---|
| items | list[AssociateItem] | array of associate items |
AssociateItem
| Parameter | Type | Description |
|---|---|---|
| appointment_id | String | (required) The ID of the appointment in I360. |
| project_id | String | (required) The ID of the existing ArcSite project. |
Connected I360 Product
Section titled “Connected I360 Product”In ArcSite, after setting up the I360 environment, you can connect an I360 Product to an ArcSite product within the ArcSite website.
To retrieve the connected I360 Product ID using an ArcSite product ID, you can utilize this API:
curl 'https://api.arcsite.com/v1/i360/connected_product/<arcsite_product_id>' \-H 'Authorization: Bearer your_api_token_here'const response = await fetch("https://api.arcsite.com/v1/i360/connected_product/<arcsite_product_id>", { headers: { Authorization: "Bearer your_api_token_here", },});const data = await response.json();import requests
response = requests.get( "https://api.arcsite.com/v1/i360/connected_product/<arcsite_product_id>", headers={"Authorization": "Bearer your_api_token_here"},)data = response.json(){ "connected_product_id": "AXh09668400GJgk"}This endpoint provides the connected I360 product ID.
POST https://api.arcsite.com/v1/i360/connected_product/<arcsite_product_id>
Webhooks for I360
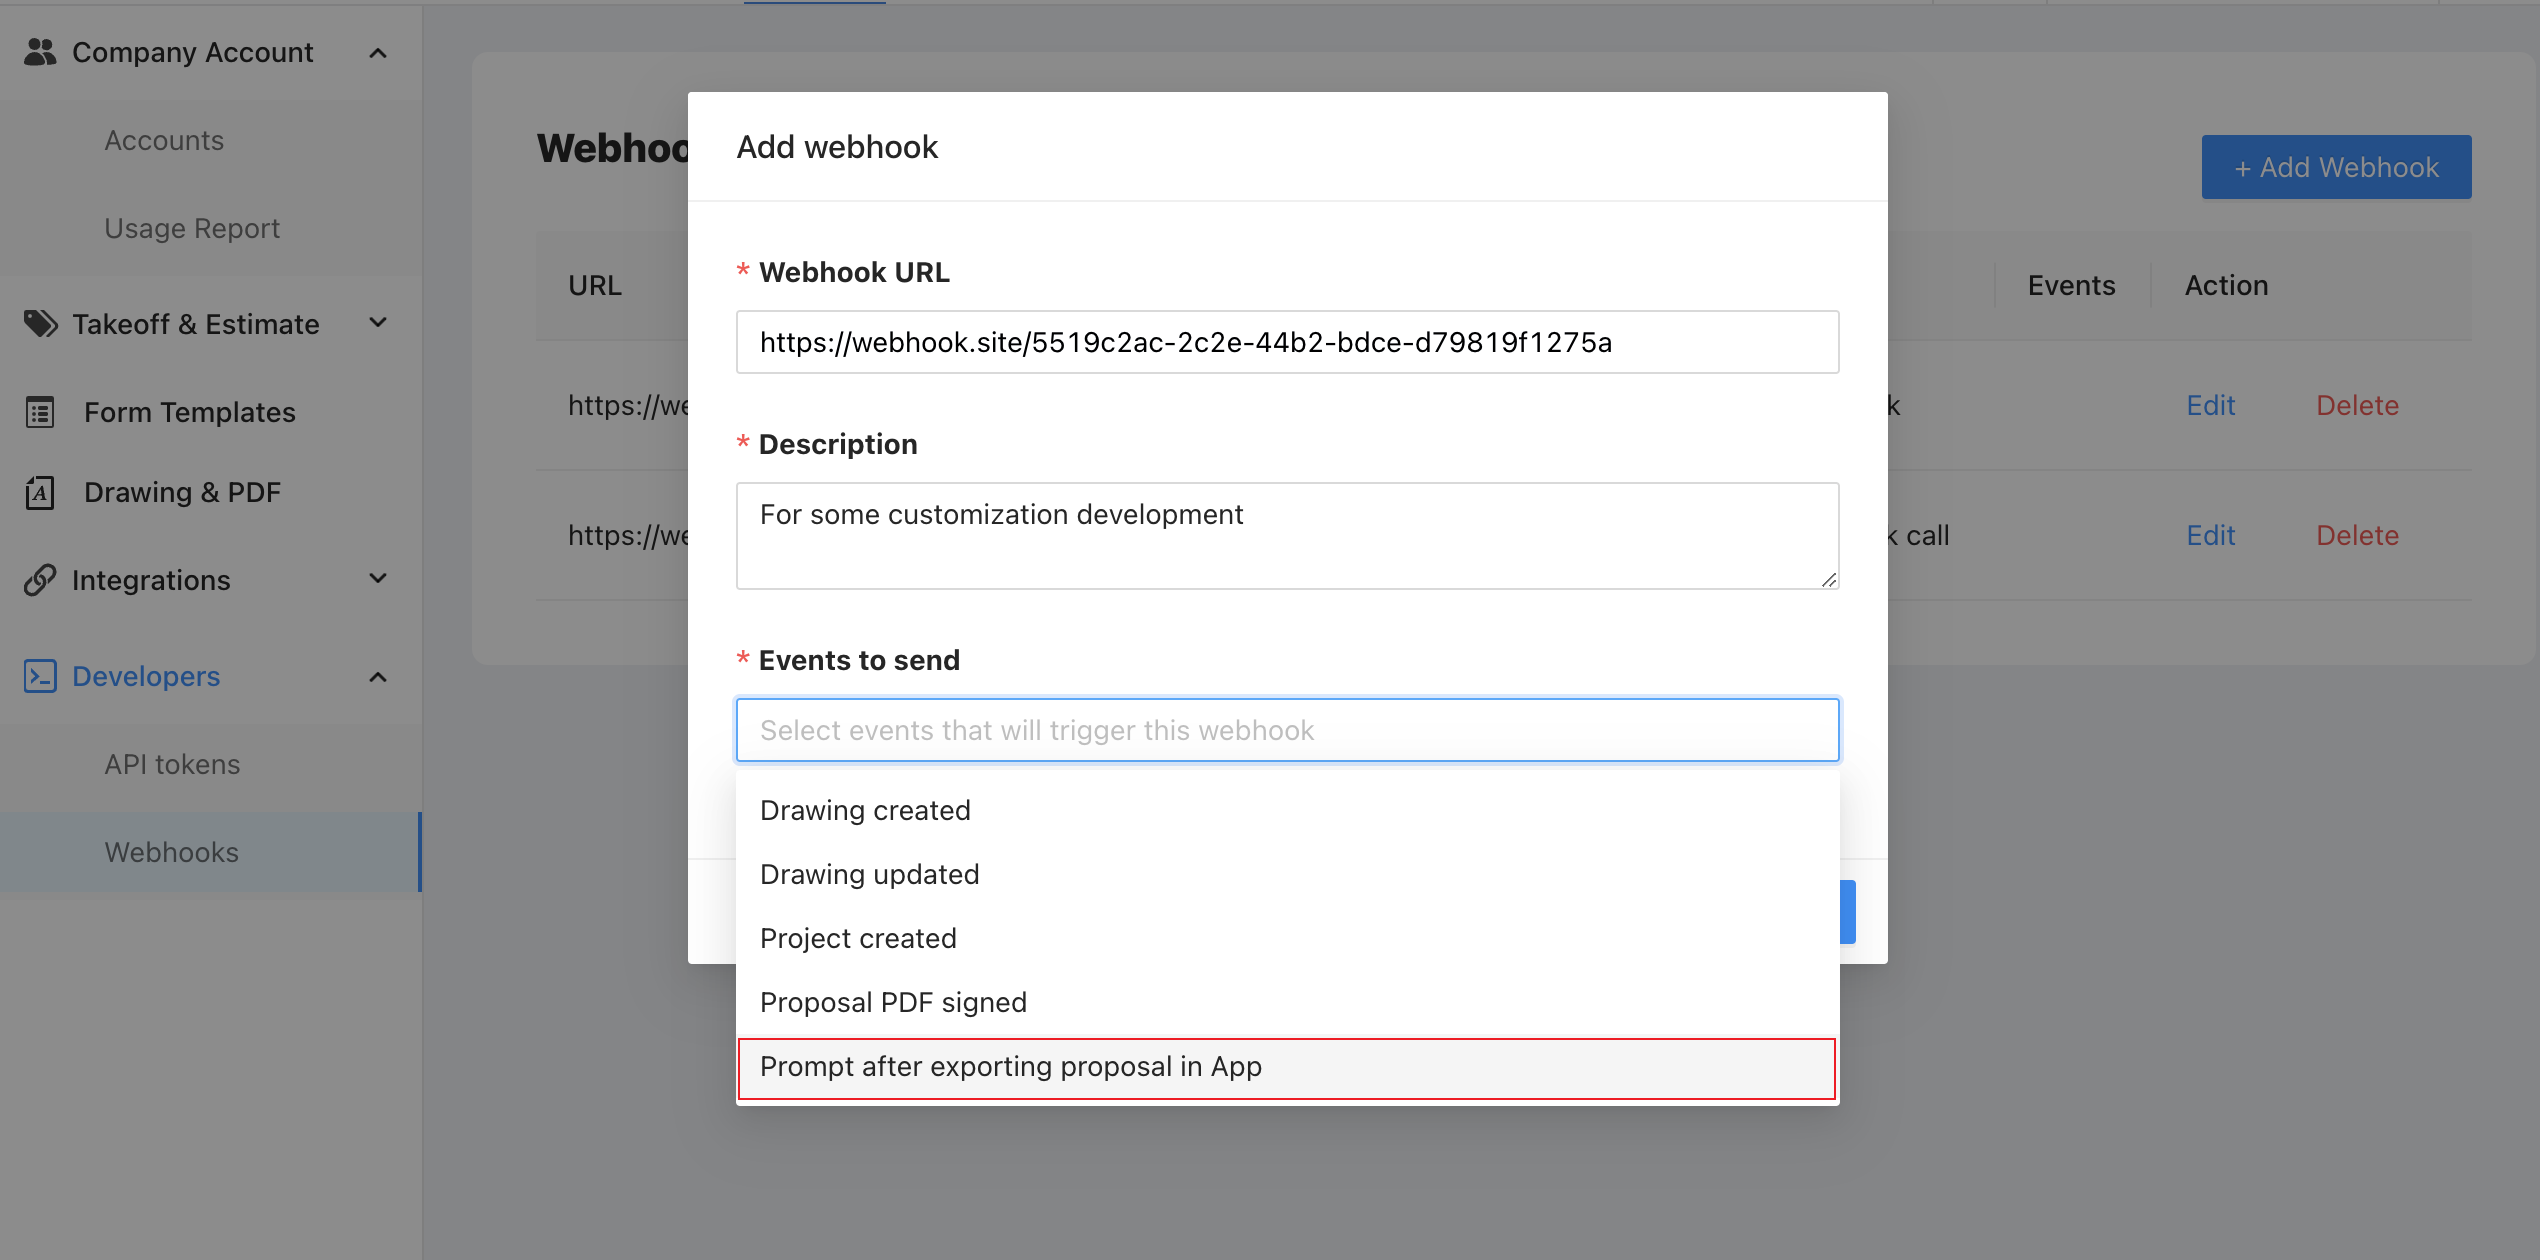
Section titled “Webhooks for I360”Prompt after exporting proposal in App
Section titled “Prompt after exporting proposal in App”This webhook is triggered after exporting a Proposal PDF in the ArcSite App and the user chooses “Yes” or “No” when prompted.
This webhook will only be triggered if:
- The project is associated with an I360 appointment.
- This webhook has been added.
- And the user exports a proposal PDF in the app.
- The user choose the “Yes” or “No” in the app when prompted.
Prompt after exporting proposal in App Webhook Payload
Section titled “Prompt after exporting proposal in App Webhook Payload”| Parameter | Type | Description |
|---|---|---|
| project_id | String | (required) The project id of the project |
| drawing_id | String | (required) The drawing of the project |
| appointment_id | String | (required) Associated Appointment ID |
| yes_no | Boolean | (required) User Selection |
Zoho CRM Integration
Section titled “Zoho CRM Integration”ArcSite Provides Out-of-the-Box Basic Standard Integration for essential features. With Basic Standard Integration, it supports associating Zoho CRM Record with ArcSite project, and pushing proposal PDF from ArcSite to associated record as attachment in Zoho CRM. No extra custom development is needed.
We also provide Webhooks for customization. Please check out those Webhooks and Customization for more details.
Zoho CRM Basic Standard Integration
Section titled “Zoho CRM Basic Standard Integration”Integrating Zoho CRM into ArcSite
For detailed settings and connection methods, please consult the setup guide: [Connecting Zoho CRM in ArcSite](https://arcsite.notion.site/Connecting-to-Zoho CRM-in-ArcSite-6a4ac0dc433d497994bc75a4b2f8982d?pvs=4).
Associating Zoho CRM Records with ArcSite Projects
- Use the ArcSite Project Create API to generate an ArcSite Project using information from a Zoho CRM record.
- Associate a Zoho CRM record with a specific ArcSite Project through Associate Zoho CRM record with ArcSite Project.
Validating the Integration
Section titled “Validating the Integration”Once you’ve successfully created the project and associated with the Zoho CRM record, you can verify the integration status in ArcSite follow these steps:
- Check if the Project created via the API appears in the Project List. If it’s missing, this indicates a project creation failure.
- Within the ArcSite app, create a Drawing within the Project and upload it to the Cloud.
- On the ArcSite user site, select the uploaded Drawing.
- In the Takeoff & Estimate Tab, ensure the Send to Zoho CRM button is visible.
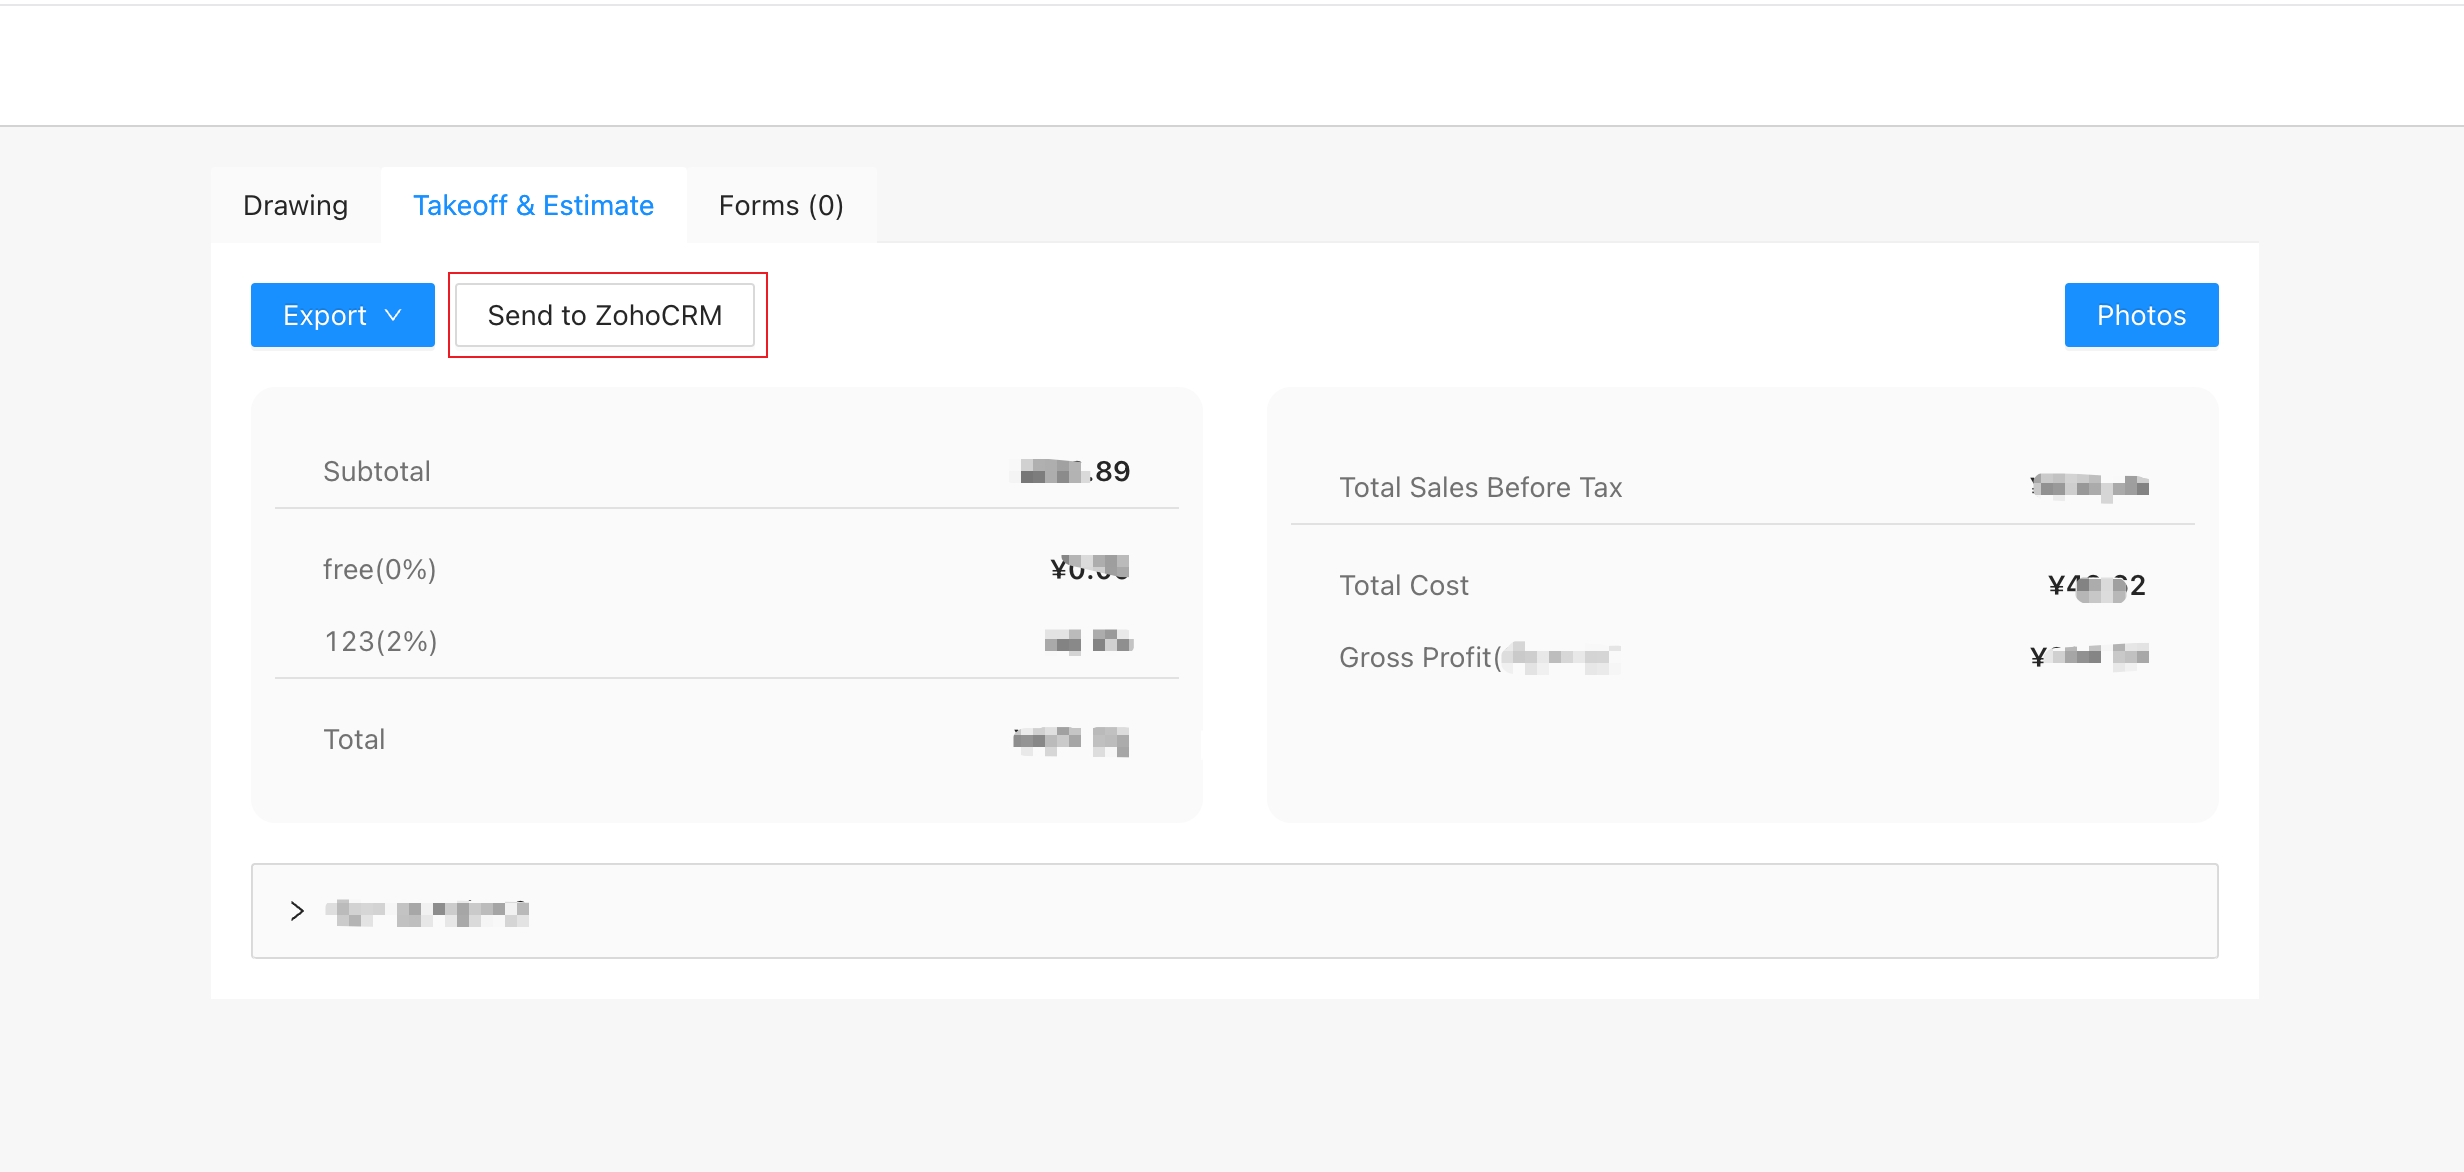
- If the Send to Zoho CRM button appears, it confirms the successful association, allowing the Project to push proposal PDF as attachment to associated Zoho CRM record. If the button is missing, this indicates a project association failure. Please check the associate API for more information.
Data Pushing Details
Section titled “Data Pushing Details”Push Proposal PDF file
Section titled “Push Proposal PDF file”-
When to Push:
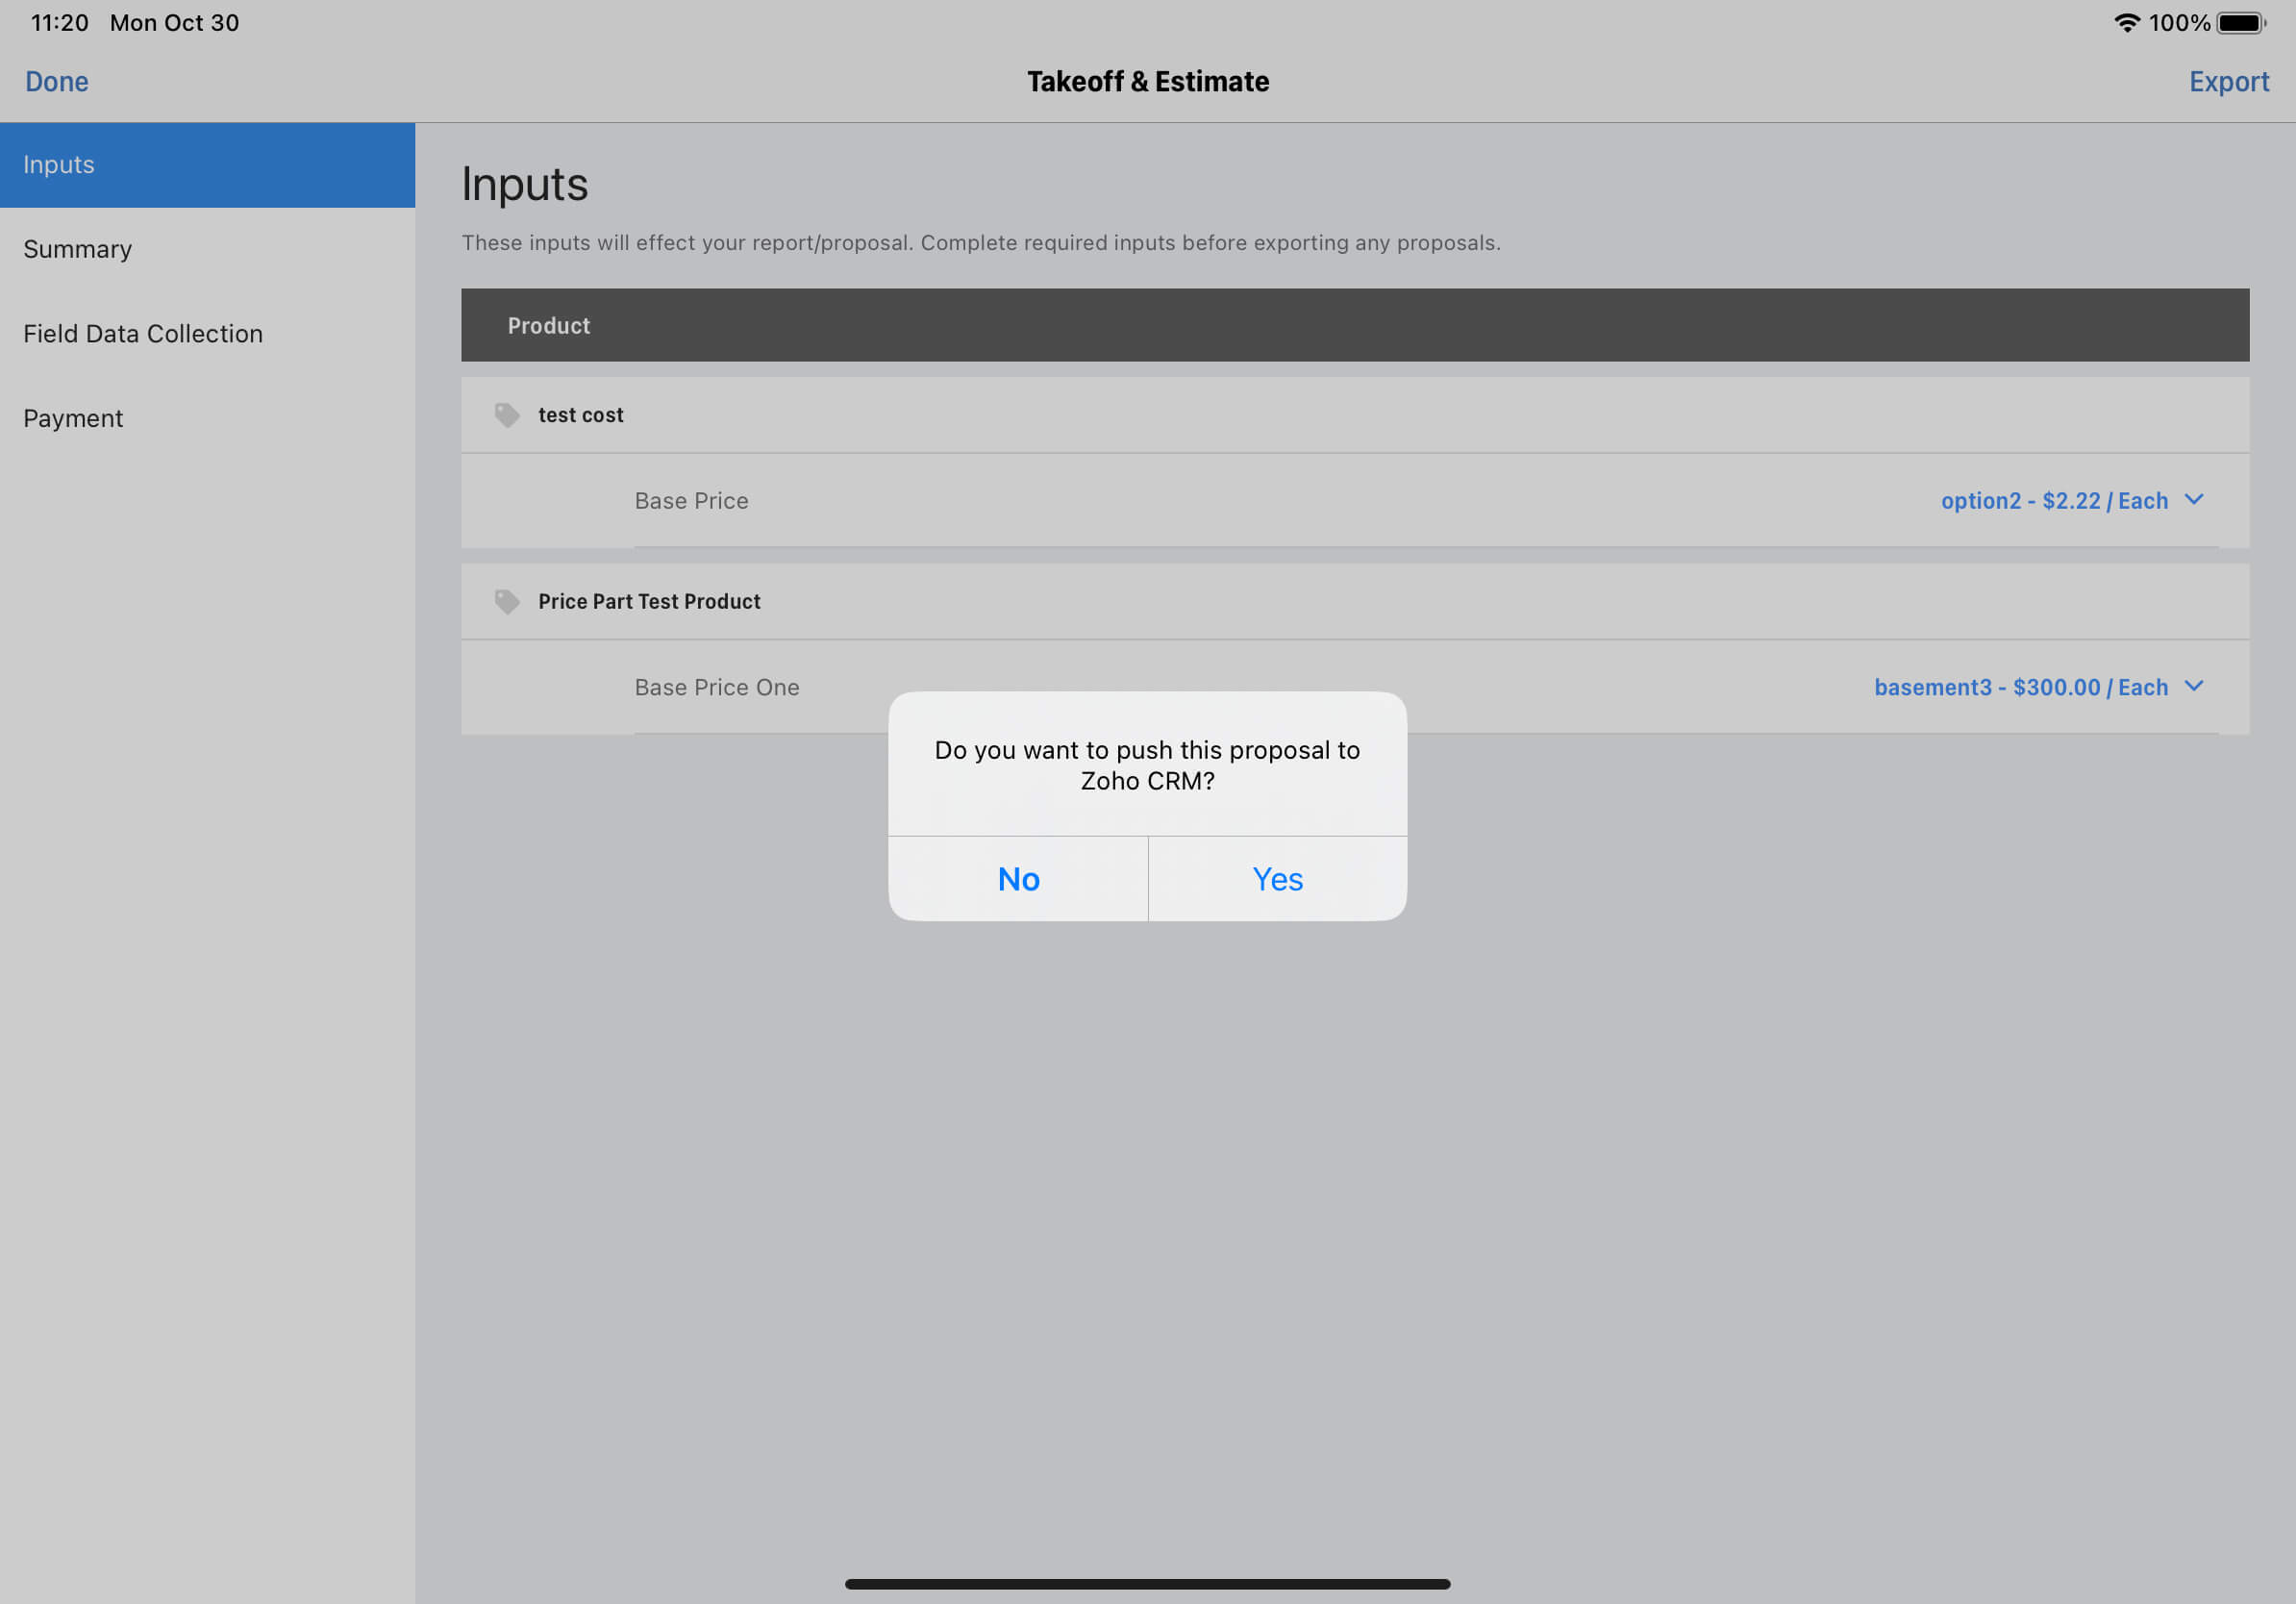 After user exports the Proposal PDF in the app, we will pop up a dialog to ask user whether to push Proposal PDF file or not.
 -
How It Works: If user choose “Yes”, this proposal PDF file will be pushed as a new attachment in the associated Zoho CRM record.
-
How to Verify: Check the file in the Attachments section of the associated Zoho CRM Record.
Webhooks and Customization for Zoho CRM
Section titled “Webhooks and Customization for Zoho CRM”You can add webhooks to do some customized logic. Check out Webhooks for Zoho CRM.
A Customization Example:
Section titled “A Customization Example:”Let’s say you want to create a Quotes record with product line items in Zoho CRM, when you push Proposal PDF attachment.
Implementation Steps:
payload = get_payload_from_webhook() # extract drawing_id, zoho_module_name and zoho_record_id from payload drawing_id = payload.drawing_id zoho_module_name = payload.zoho_module_name zoho_record_id = payload.zoho_record_id if payload.yes_no is False # Do nothing or other logic else # Fetch all Line Items info using drawing_id line_items = request_arcsite_drawing_line_items_api(drawing_id) # Create Zoho CRM Quotes or other record with the line items data-
Complete Basic Integration and add the Proposal Exported in App Webhook.
-
ArcSite sends payload data to your webhook URL. You should to extract the
yes_nofrom the payload and handle the logic like the sample code right side. -
Extract
Drawing IDandzoho_moduleandzoho_record_idfrom the payload. -
Fetch all Line items info using the
drawing_idvia Drawing Line Items API. -
Create Quotes record with Drawing Line Items Data
- Deal_Name: Use the
zoho_moduleandzoho_record_idto fetch the Deals record name from Zoho CRM. - Discount: Use the sum of
discountandmarkupfrom the drawing line items data. - Tax: Use line items sum of
taxas theTaxof Quotes record. - Quoted_Items: Use the line items data to create the
Quoted_Itemsof Quotes record- Product_Name: Use the
nameof the line item, you can use thenameto fetch the product from Zoho CRM. - Quantity: Use the
quantityof line item - Price_Book_Name: Use the
zoho_product_idfetched before to get or create PriceBook data from Zoho CRM.
- Product_Name: Use the
- Deal_Name: Use the
-
Optionally, modify the record status or add other custom features.
APIs for Zoho CRM
Section titled “APIs for Zoho CRM”Associate Zoho CRM Record with ArcSite Project
Section titled “Associate Zoho CRM Record with ArcSite Project”curl -X POST 'https://api.arcsite.com/v1/zoho_crm/associate_project' \-H 'Authorization: Bearer your_api_token_here' \-H 'Content-Type: application/json' \-d '{ "zoho_module": "Deals", "zoho_record_id": "598254512451545", "project_id": "36029621653386360"}'const response = await fetch("https://api.arcsite.com/v1/zoho_crm/associate_project", { method: "POST", headers: { Authorization: "Bearer your_api_token_here", "Content-Type": "application/json", }, body: JSON.stringify({ zoho_module: "Deals", zoho_record_id: "598254512451545", project_id: "36029621653386360", }),});const data = await response.json();import requests
response = requests.post( "https://api.arcsite.com/v1/zoho_crm/associate_project", headers={"Authorization": "Bearer your_api_token_here"}, json={ "zoho_module": "Deals", "zoho_record_id": "598254512451545", "project_id": "36029621653386360", },)data = response.json(){ "id": "36029621653386360", "name": "nac", "created_at": "2022-01-16T03:31:39", "updated_at": "2022-01-16T03:31:39", "job_number": "heeloo", "customer": { "name": "hello", "phone": "122112", "second_phone": "122112", "email": "dev@arctuition.com", "second_email": "dev@arctuition.com", "address": { "street": "address", "city": "city", "county": "county", "state": "state", "zip_code": "200544" } }, "work_site_address": { "street": "street", "city": "city", "county": "county", "state": "state", "zip_code": "300433" }, "sales_rep": { "name": "Wang", "email": "dev@arctuition.com", "phone": "122112" }, "tags": ["tag1", "tag2"]}This endpoint establishes an association between a Zoho CRM record and an existing ArcSite project.
POST https://api.arcsite.com/v1/zoho_crm/associate_project
Parameters
Section titled “Parameters”| Parameter | Type | Description |
|---|---|---|
| zoho_module | String | (required) The Name of the Record in Zoho CRM, the value should one of Deals, Quotes, Leads and Contacts. |
| zoho_record_id | String | (required) The ID of the record in Zoho CRM. |
| project_id | Int | (required) The ID of the existing ArcSite project. |
Webhooks for Zoho CRM
Section titled “Webhooks for Zoho CRM”Prompt after exporting proposal in App for Zoho CRM
Section titled “Prompt after exporting proposal in App for Zoho CRM”This webhook is triggered after exporting a Proposal PDF in the ArcSite App and the user chooses “Yes” or “No” when prompted.
This webhook will only be triggered if:
- The project is associated with a Zoho CRM record.
- This webhook has been added.
- And the user export Proposal PDF.
- The user choose the “Yes” or “No” in the app when prompted.
Prompt after exporting proposal in App Webhook Payload
Section titled “Prompt after exporting proposal in App Webhook Payload”| Parameter | Type | Description |
|---|---|---|
| project_id | String | (required) The project id of the project |
| drawing_id | String | (required) The drawing of the project |
| zoho_module | String | (required) The name of the Zoho CRM module, the value should one of Deals, Quotes, Leads and Contacts. |
| zoho_record_id | String | (required) The record ID in Zoho CRM |
| yes_no | Boolean | (required) User Selection |
Salesforce Integration
Section titled “Salesforce Integration”ArcSite Provides Out-of-the-Box Basic Standard Integration for essential features. With Basic Standard Integration, it supports auto-pushing drawing PDFs, proposal PDFs and pricing data to Salesforce.
We also provide Webhooks and APIs for customization. Please check out those Webhooks and APIs for customization for more details.
Basic Standard Integration for Salesforce
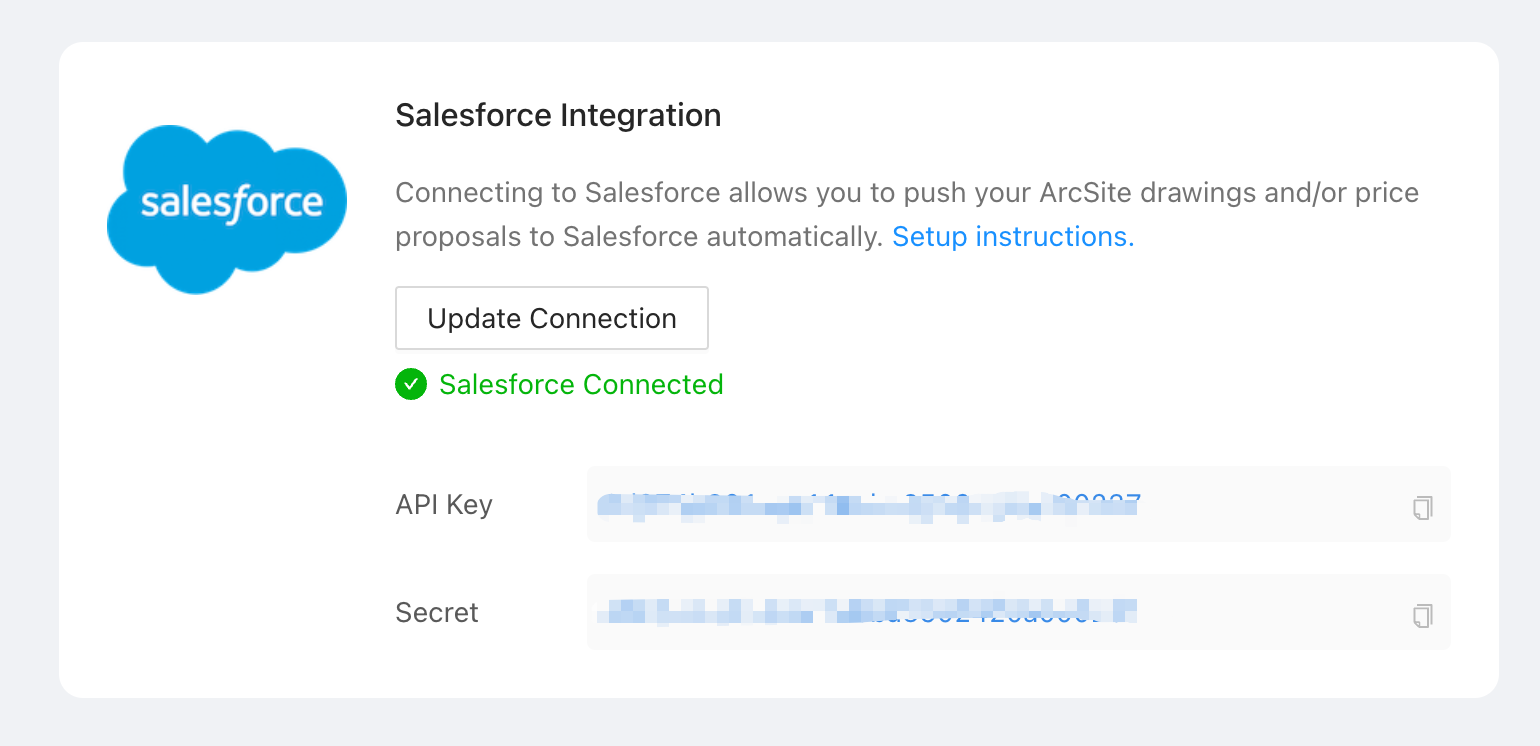
Section titled “Basic Standard Integration for Salesforce”Integrating Salesforce into ArcSite
For detailed settings and connection methods, please consult the setup guide: ArcSite Salesforce Standard Integration.
Associating Salesforce Opportunity with ArcSite Projects
- Use the ArcSite Project Create API to create an ArcSite project using information from a Salesforce opportunity.
- Associate a Salesforce opportunity with a specific ArcSite project through Associate Salesforce Opportunity with ArcSite Project.
Validating the Integration
Section titled “Validating the Integration”Once you’ve successfully created the project and associated with the opportunity, you can verify the integration status in ArcSite follow these steps:
- Check if the project created via the API appears in the project List. If it’s missing, this indicates a project creation failure.
- Within the ArcSite app, create a drawing within the project and upload it to the Cloud.
- On the ArcSite user site, select the uploaded drawing.
- In the Takeoff & Estimate Tab, ensure the Send to Salesforce button is visible.
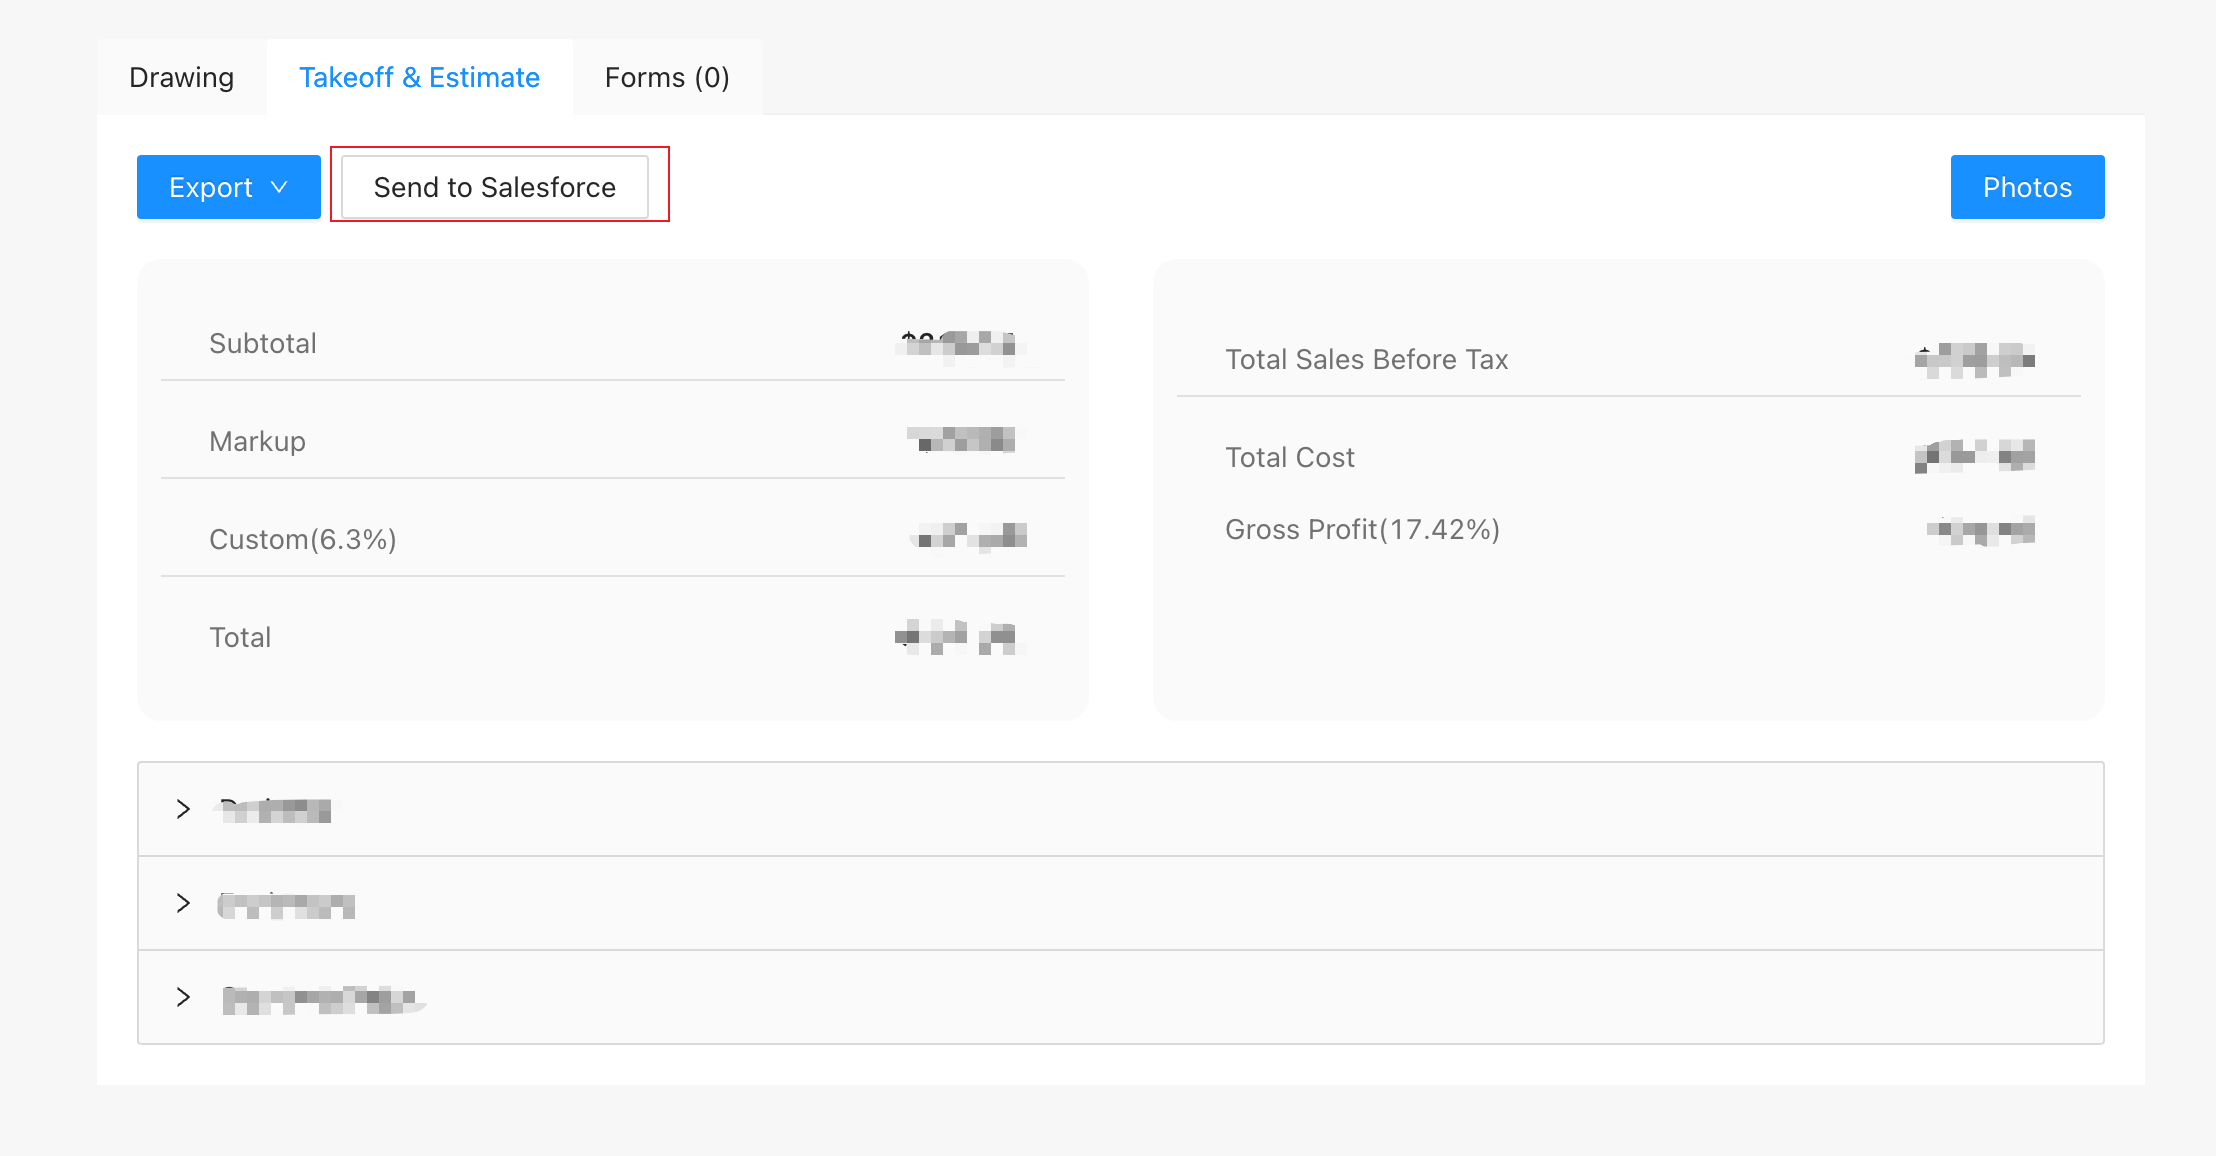
- If the Send to Salesforce button appears, it confirms the successful association, allowing the project to push data to associated salesforce opportunity. If the button is missing, this indicates a project association failure. Please check the associate API for more information.
Connecting Products between ArcSite and Salesforce
Section titled “Connecting Products between ArcSite and Salesforce”ArcSite supports the connection of one salesforce product2 to an ArcSite product through the ArcSite Product Manager web page in user site. Once connected, this connection relationship will be used when ArcSite pushes Line Items data to Salesforce.
To connect products, follow these steps:
- Verify that the Salesforce environment is correctly set up, and the product exists in both Salesforce and ArcSite.
- Navigate to
Integrations->Product Managerto locate the product you wish to connect.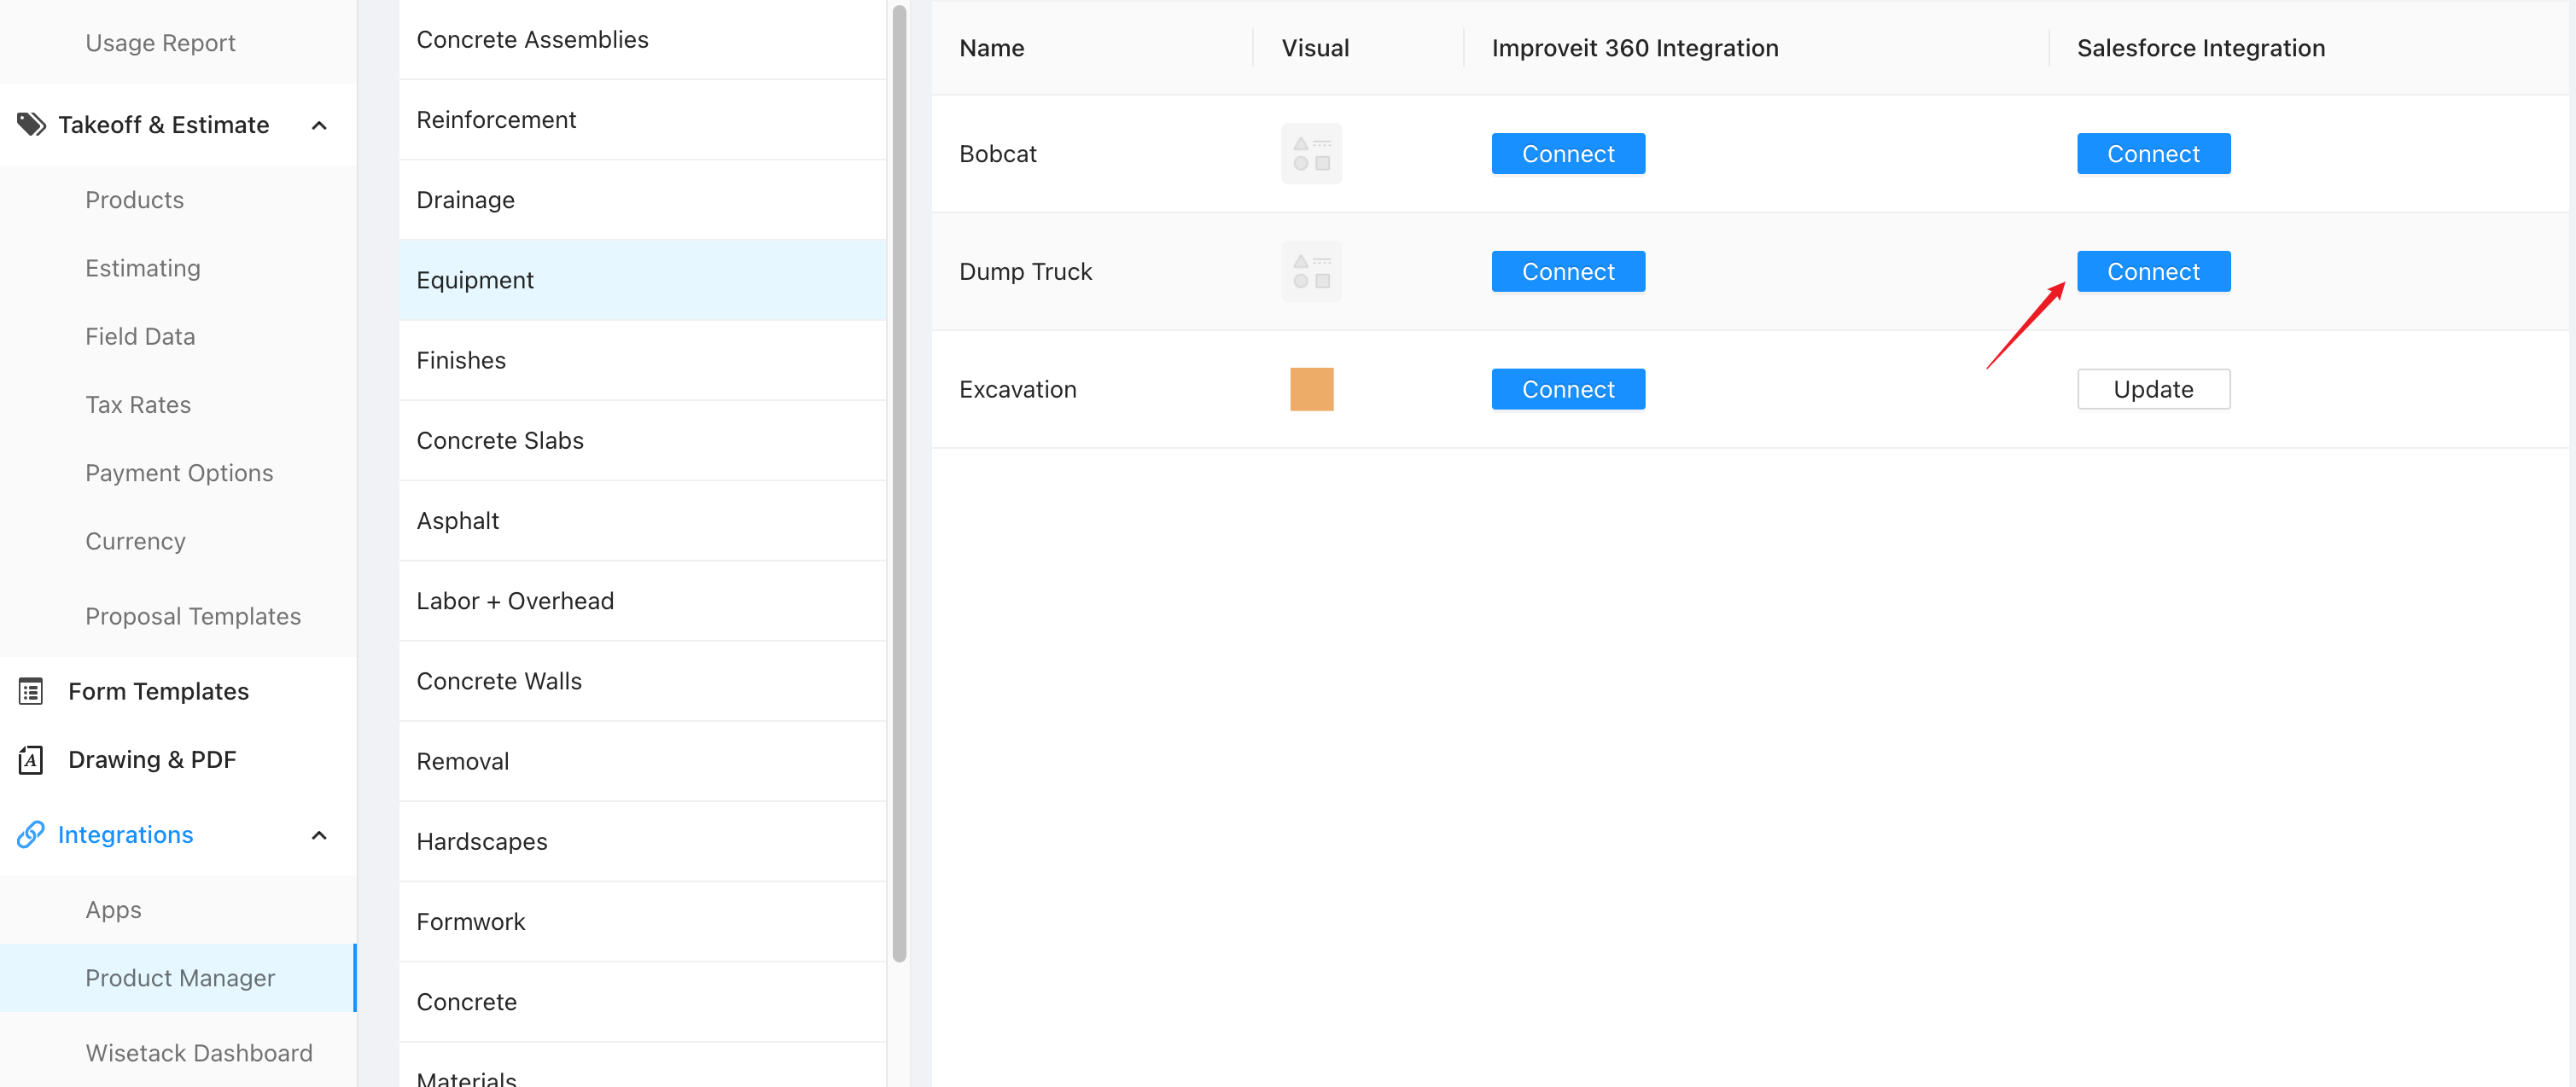
- Click the connect button and select the corresponding Salesforce Product2.
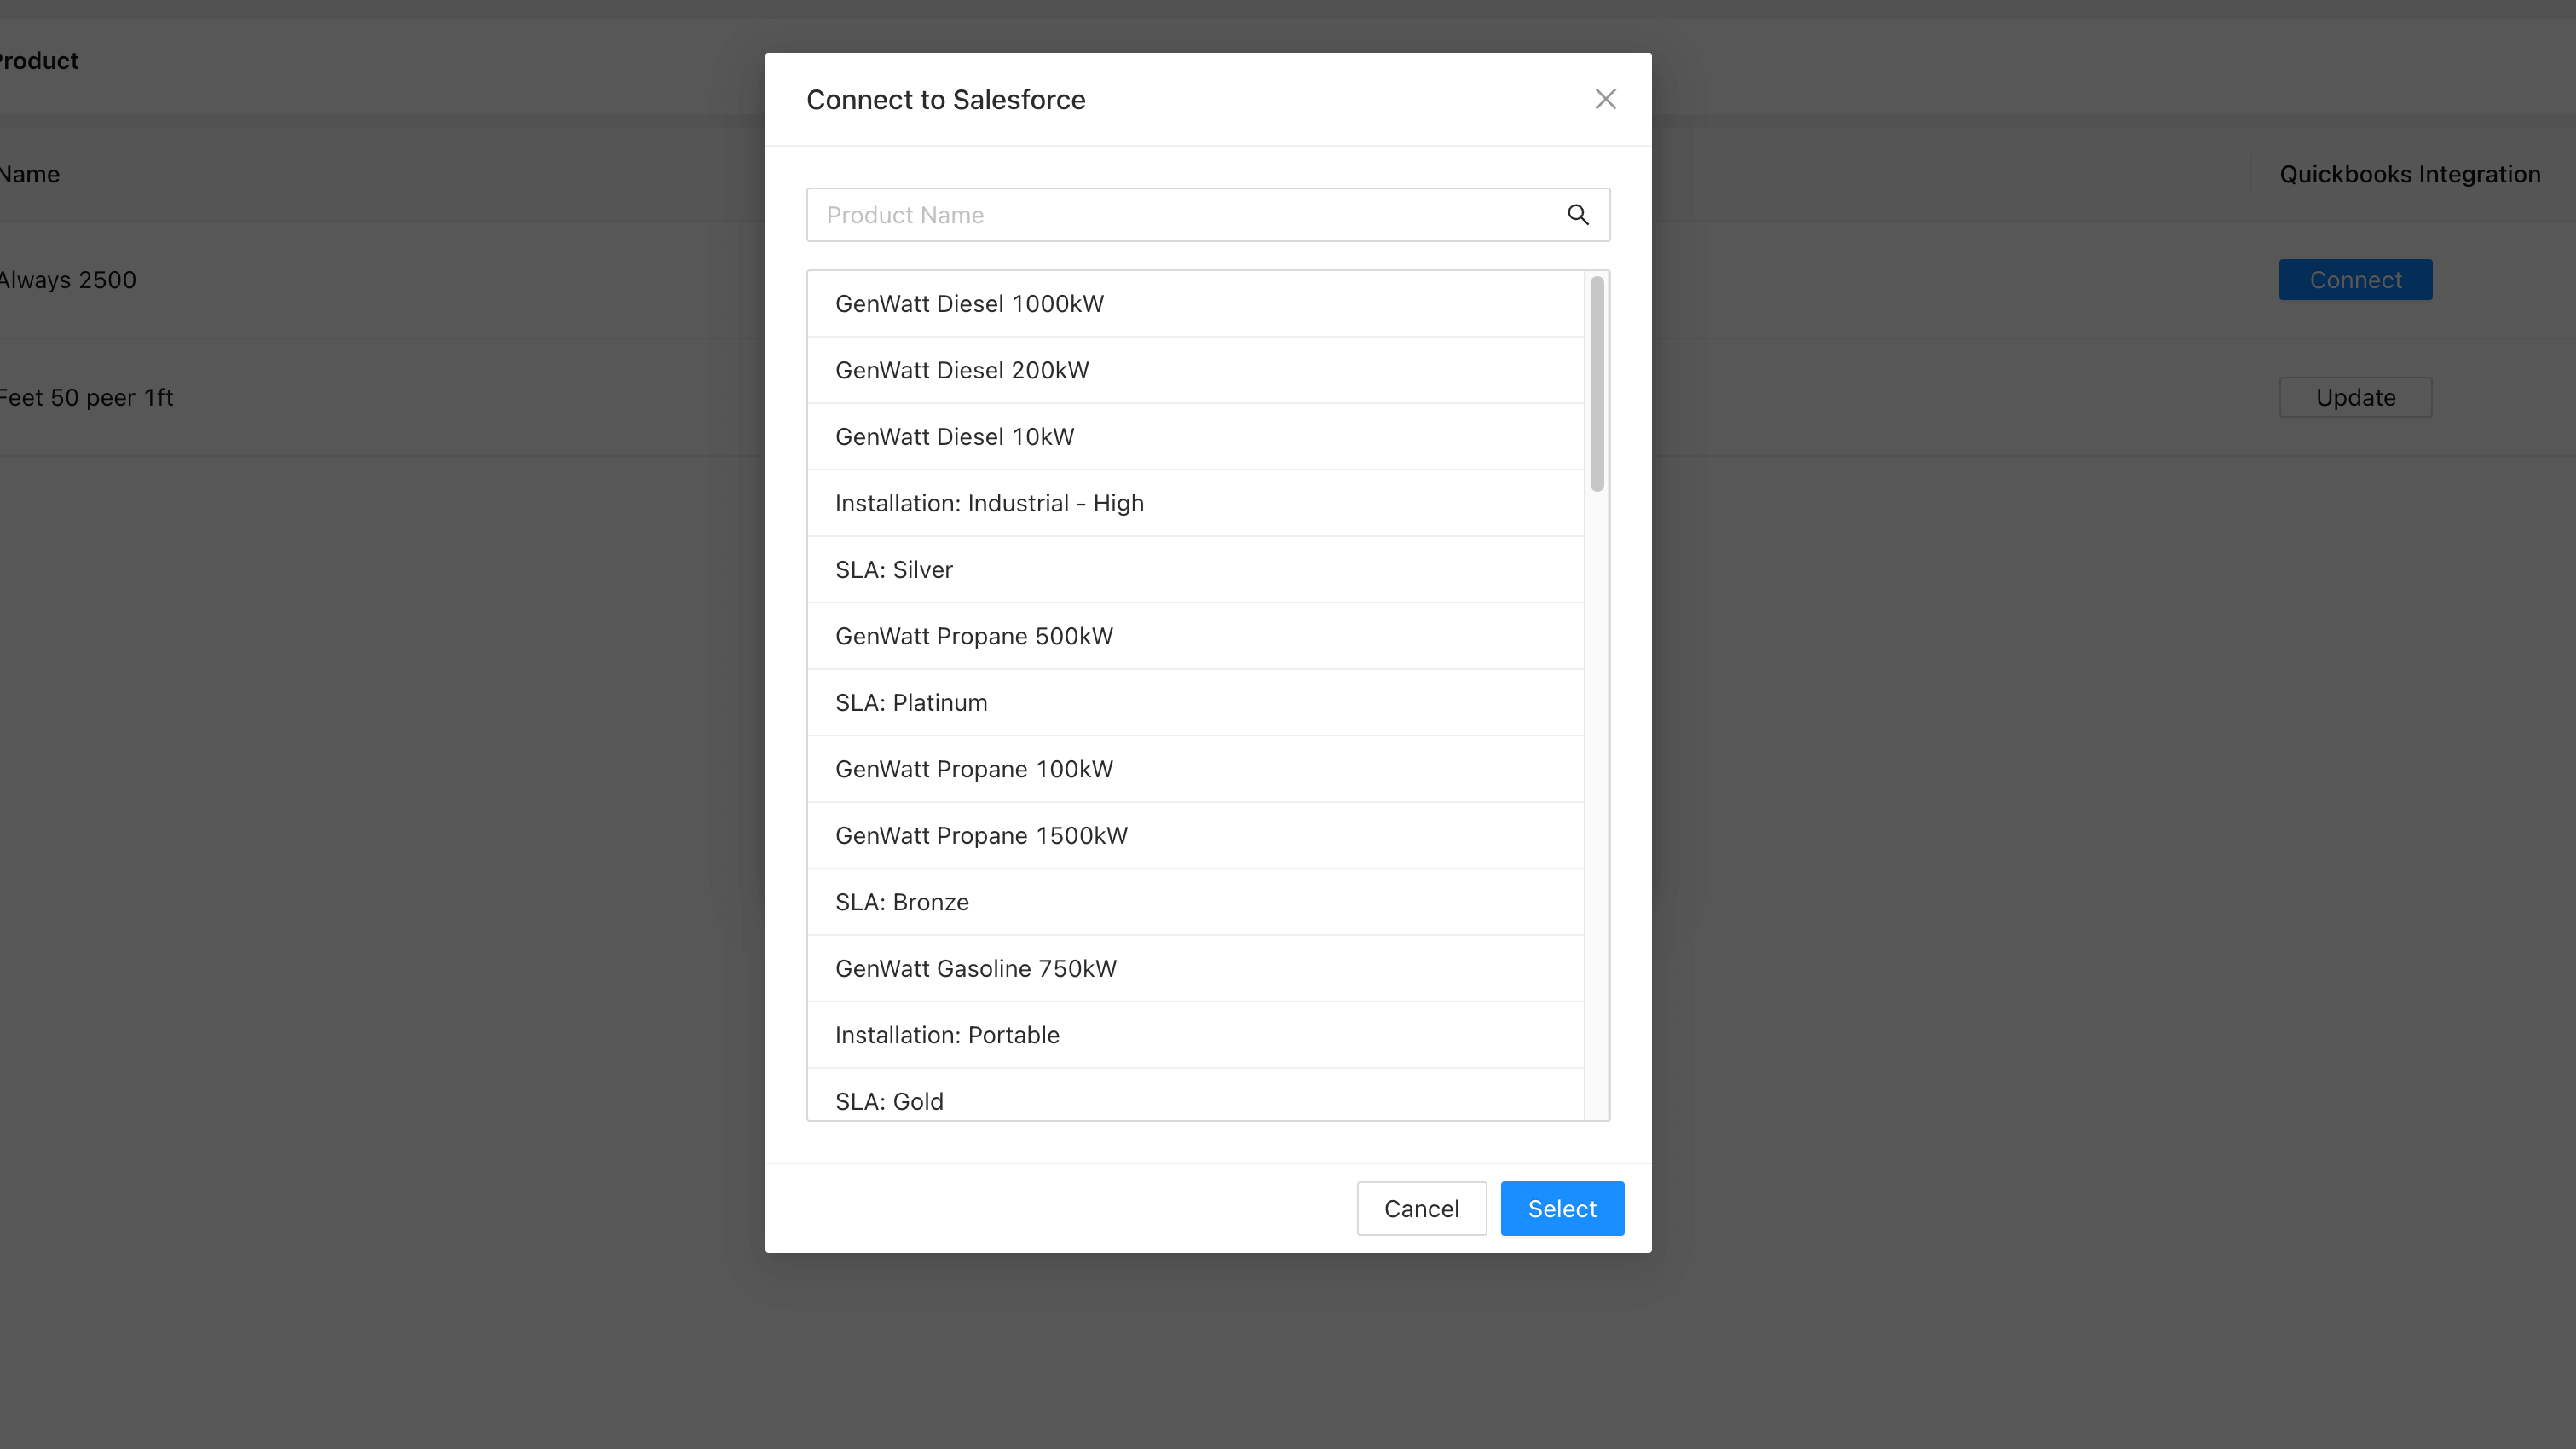
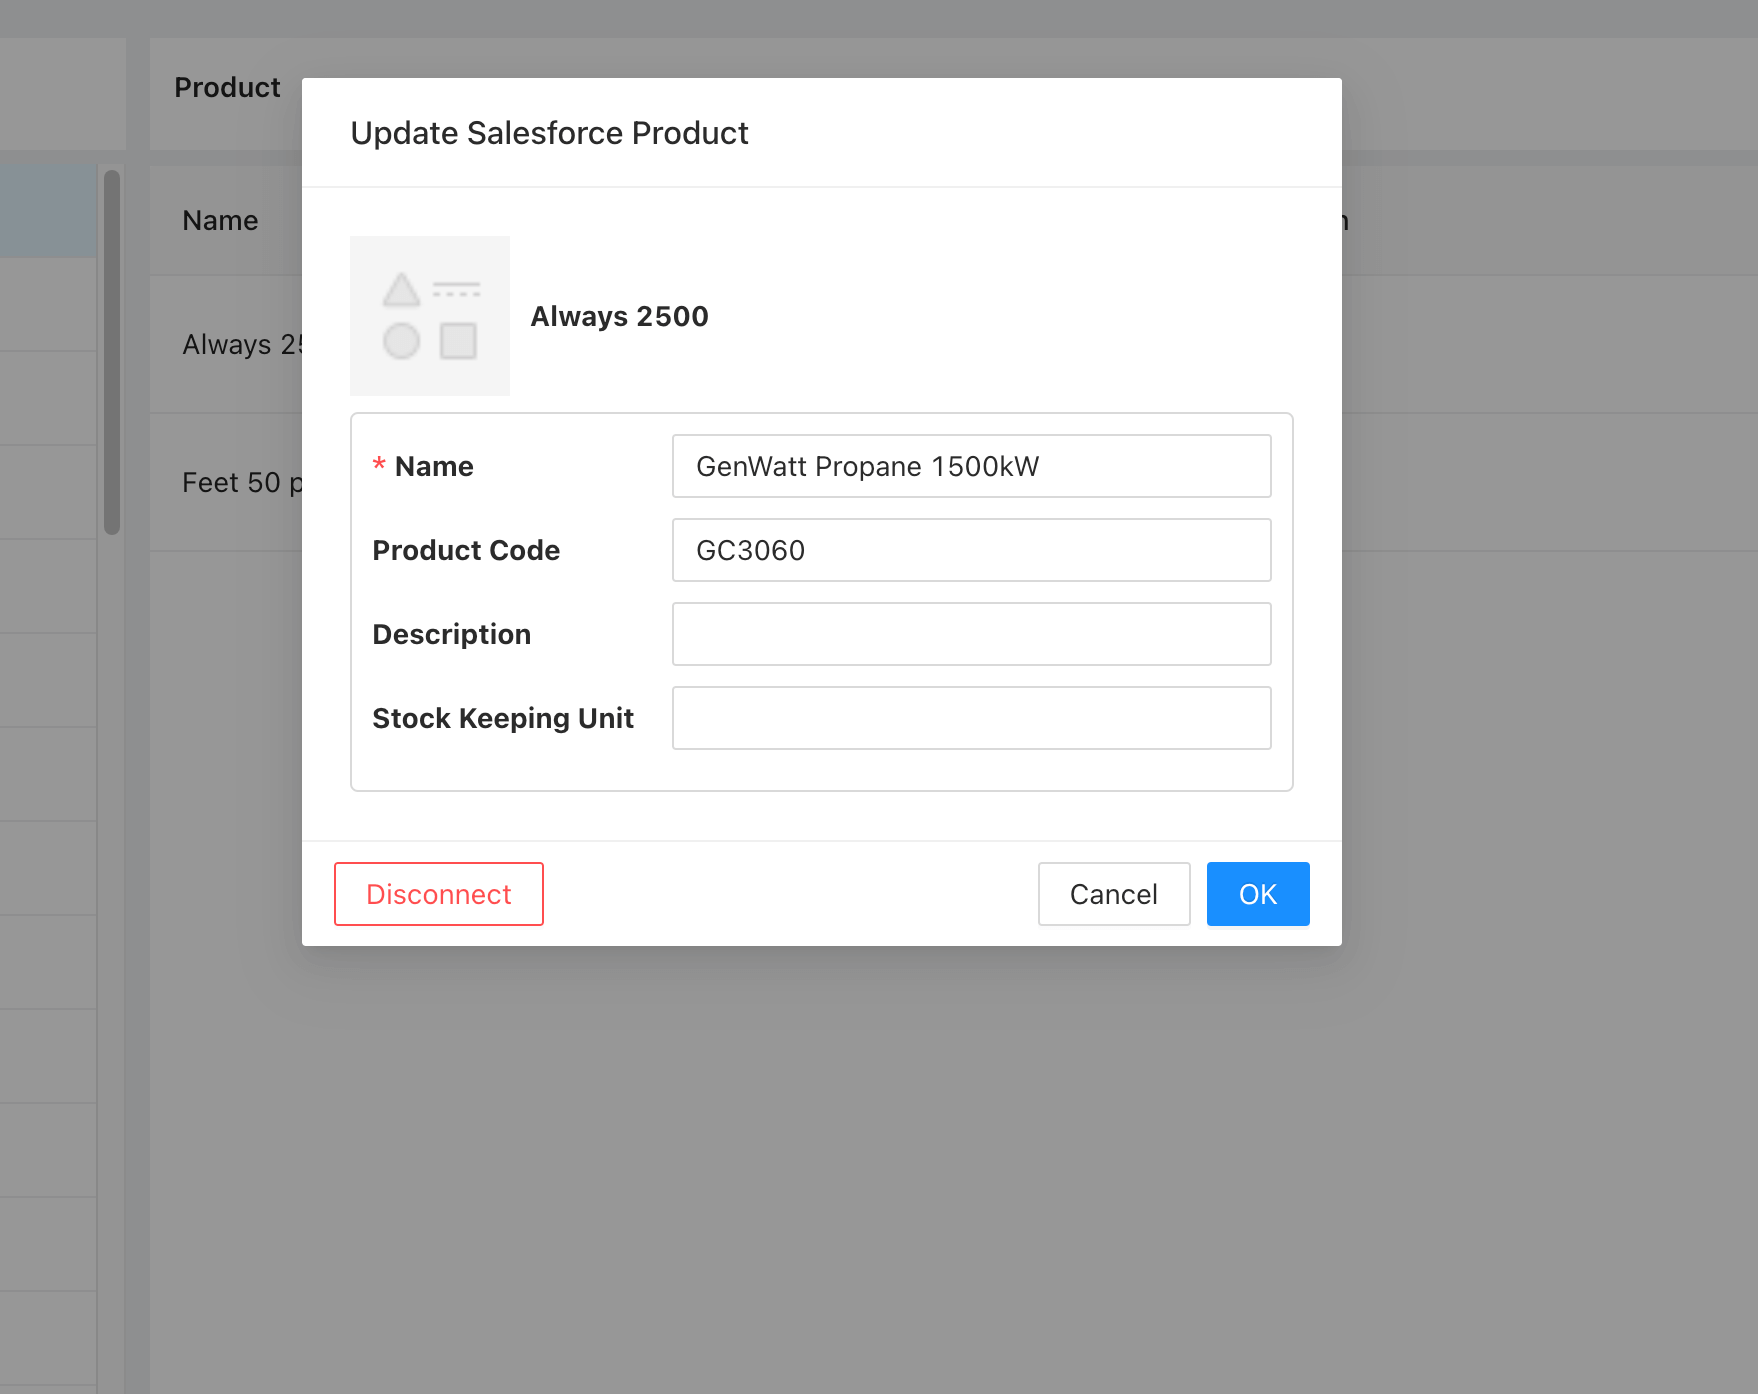
- After connecting, the product status changes to connected, and the Connect button becomes Update.
- If you wish to disconnect products, you can click Update, followed by the Disconnect button.
Data Pushing Details
Section titled “Data Pushing Details”We categorize data pushing into three types based on the data involved:
Automatic Push for Drawing PDF
Section titled “Automatic Push for Drawing PDF”-
When to Push:
When user clicks the “Upload to Cloud” button or exports the custom proposal in the app, we will trigger out push to Salesforce. -
How It Works: The latest Drawing PDFs are generated and automatically pushing to Salesforce, replacing any existing files.
-
How to Verify: Check these files in the ContentDocument section of the associated Salesforce Opportunity.
Manual Push for Proposal PDF
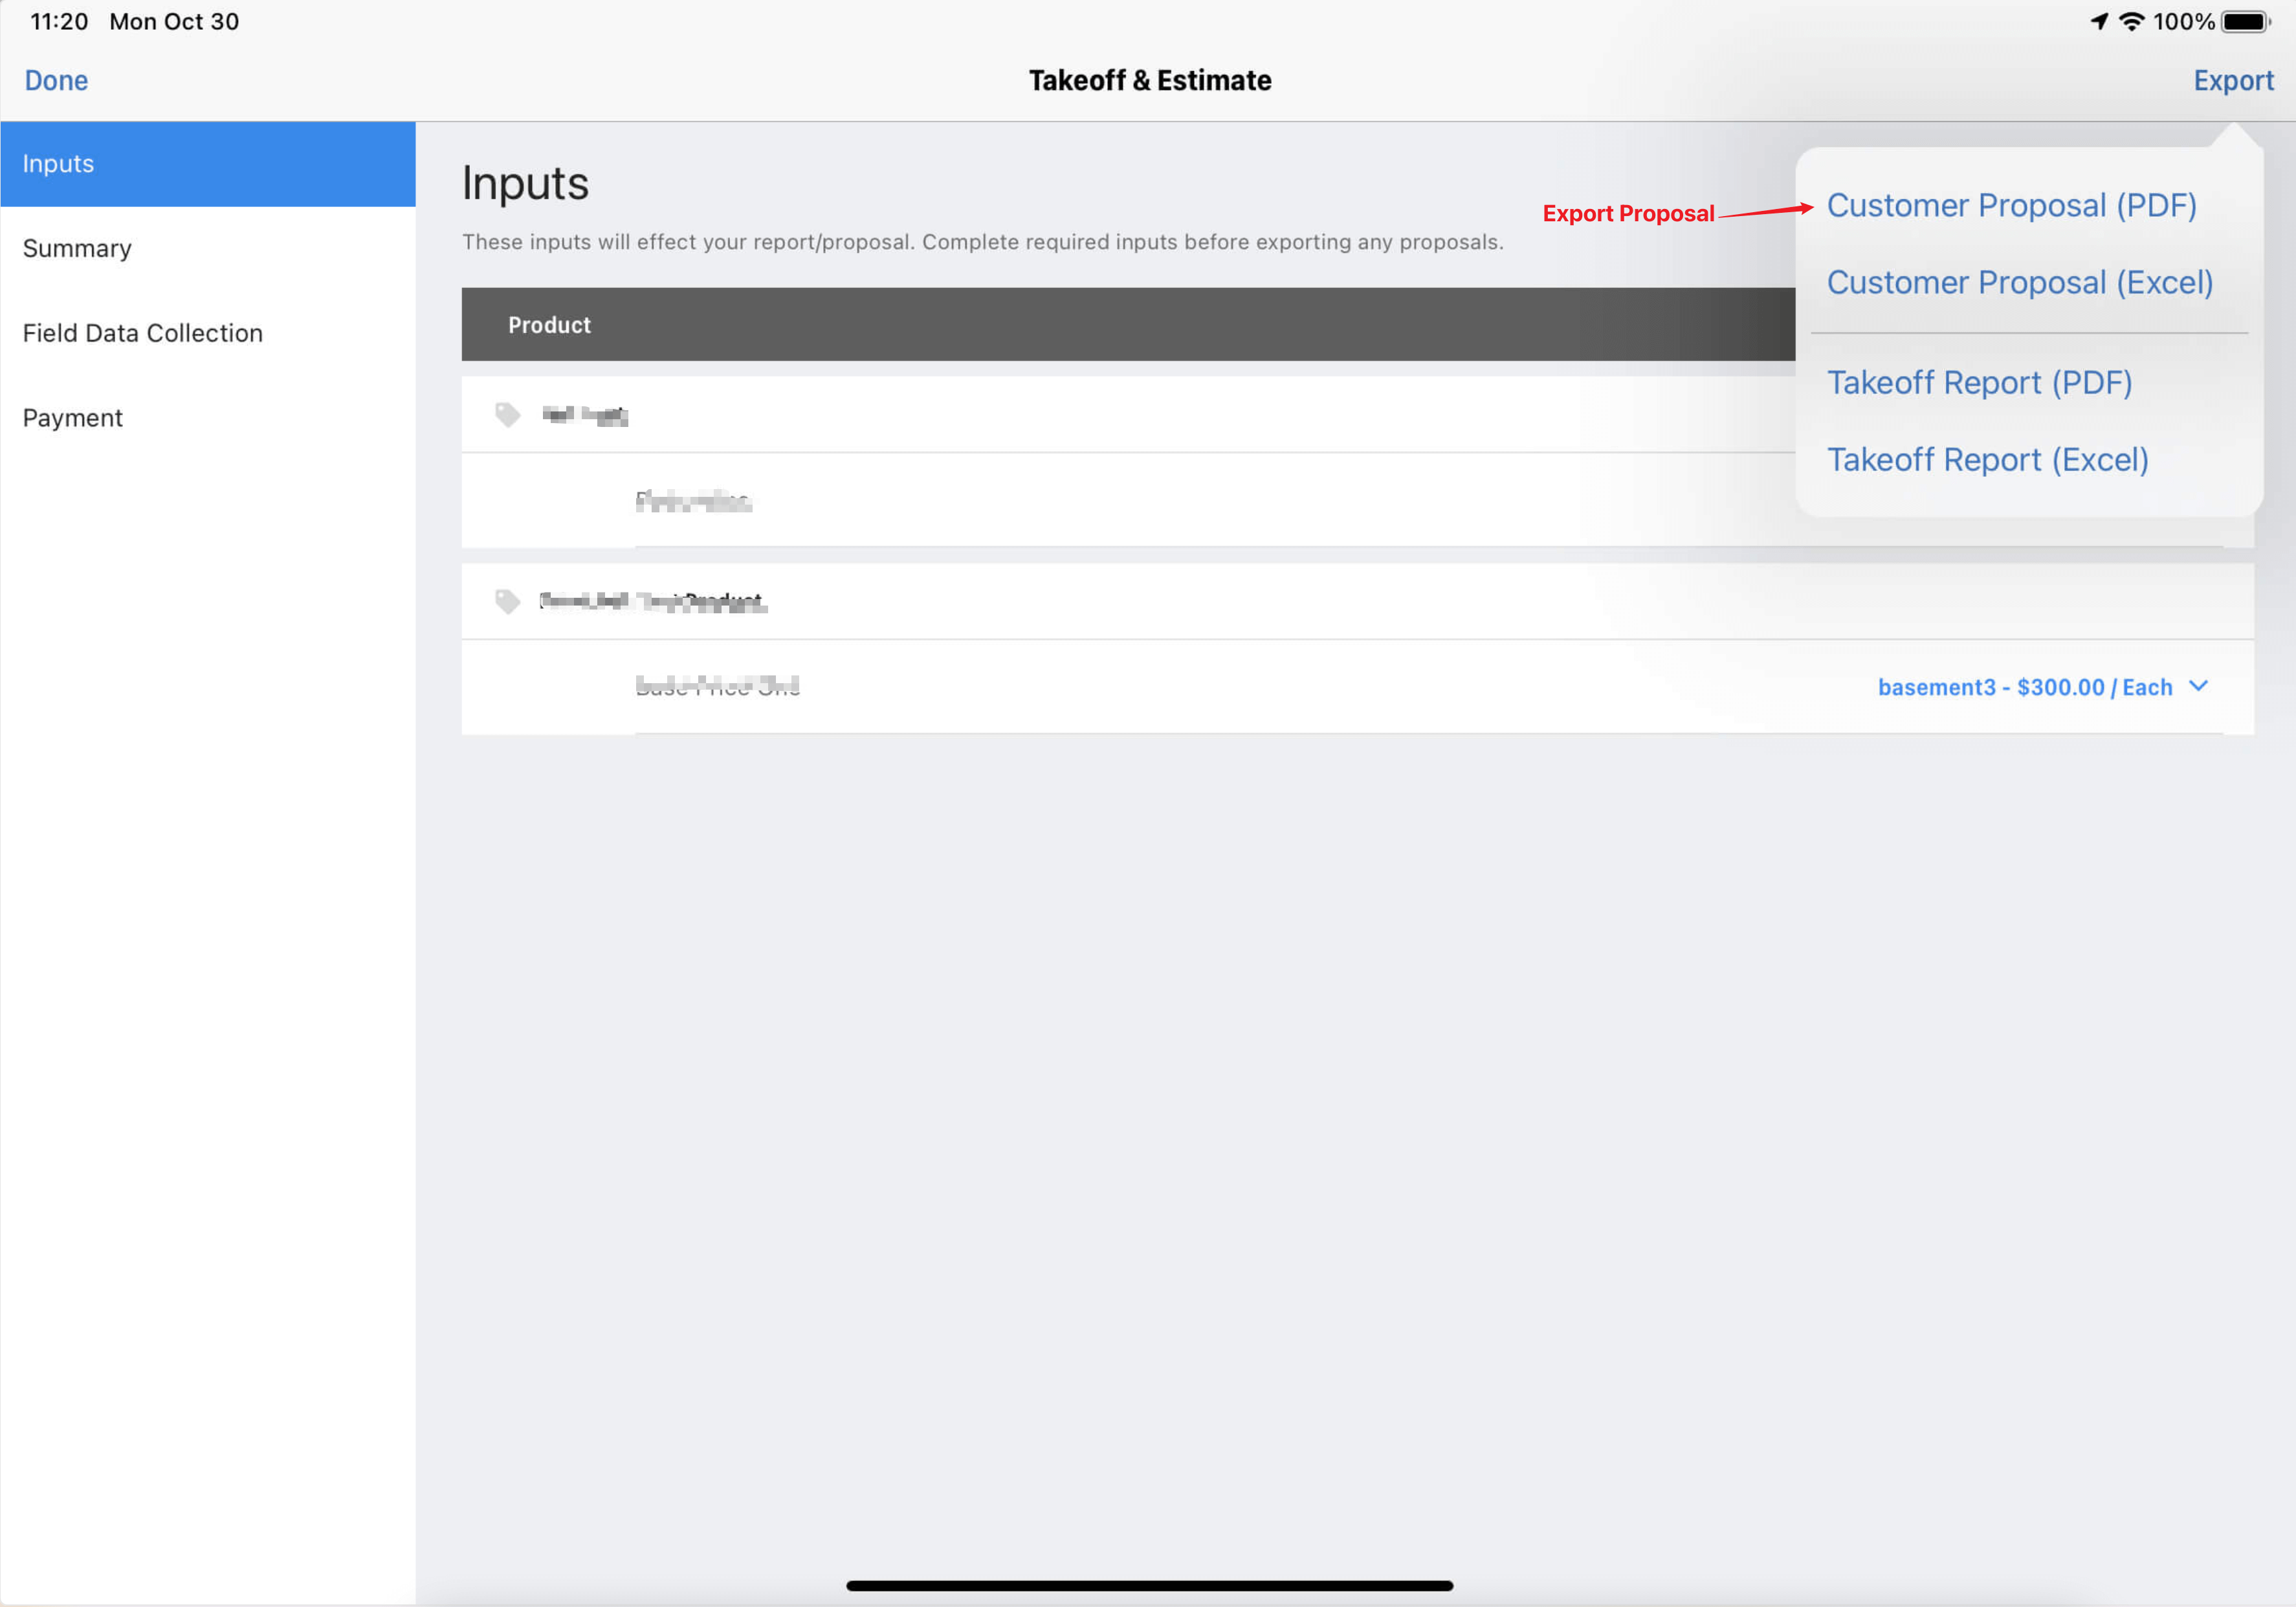
Section titled “Manual Push for Proposal PDF”- When to Push:
Proposal PDF will be triggered:
- When user clicks the
Exportbutton in the app, aDo you want to push this proposal to Salesforce?pop-up appears, if you select “Yes” it will trigger the push.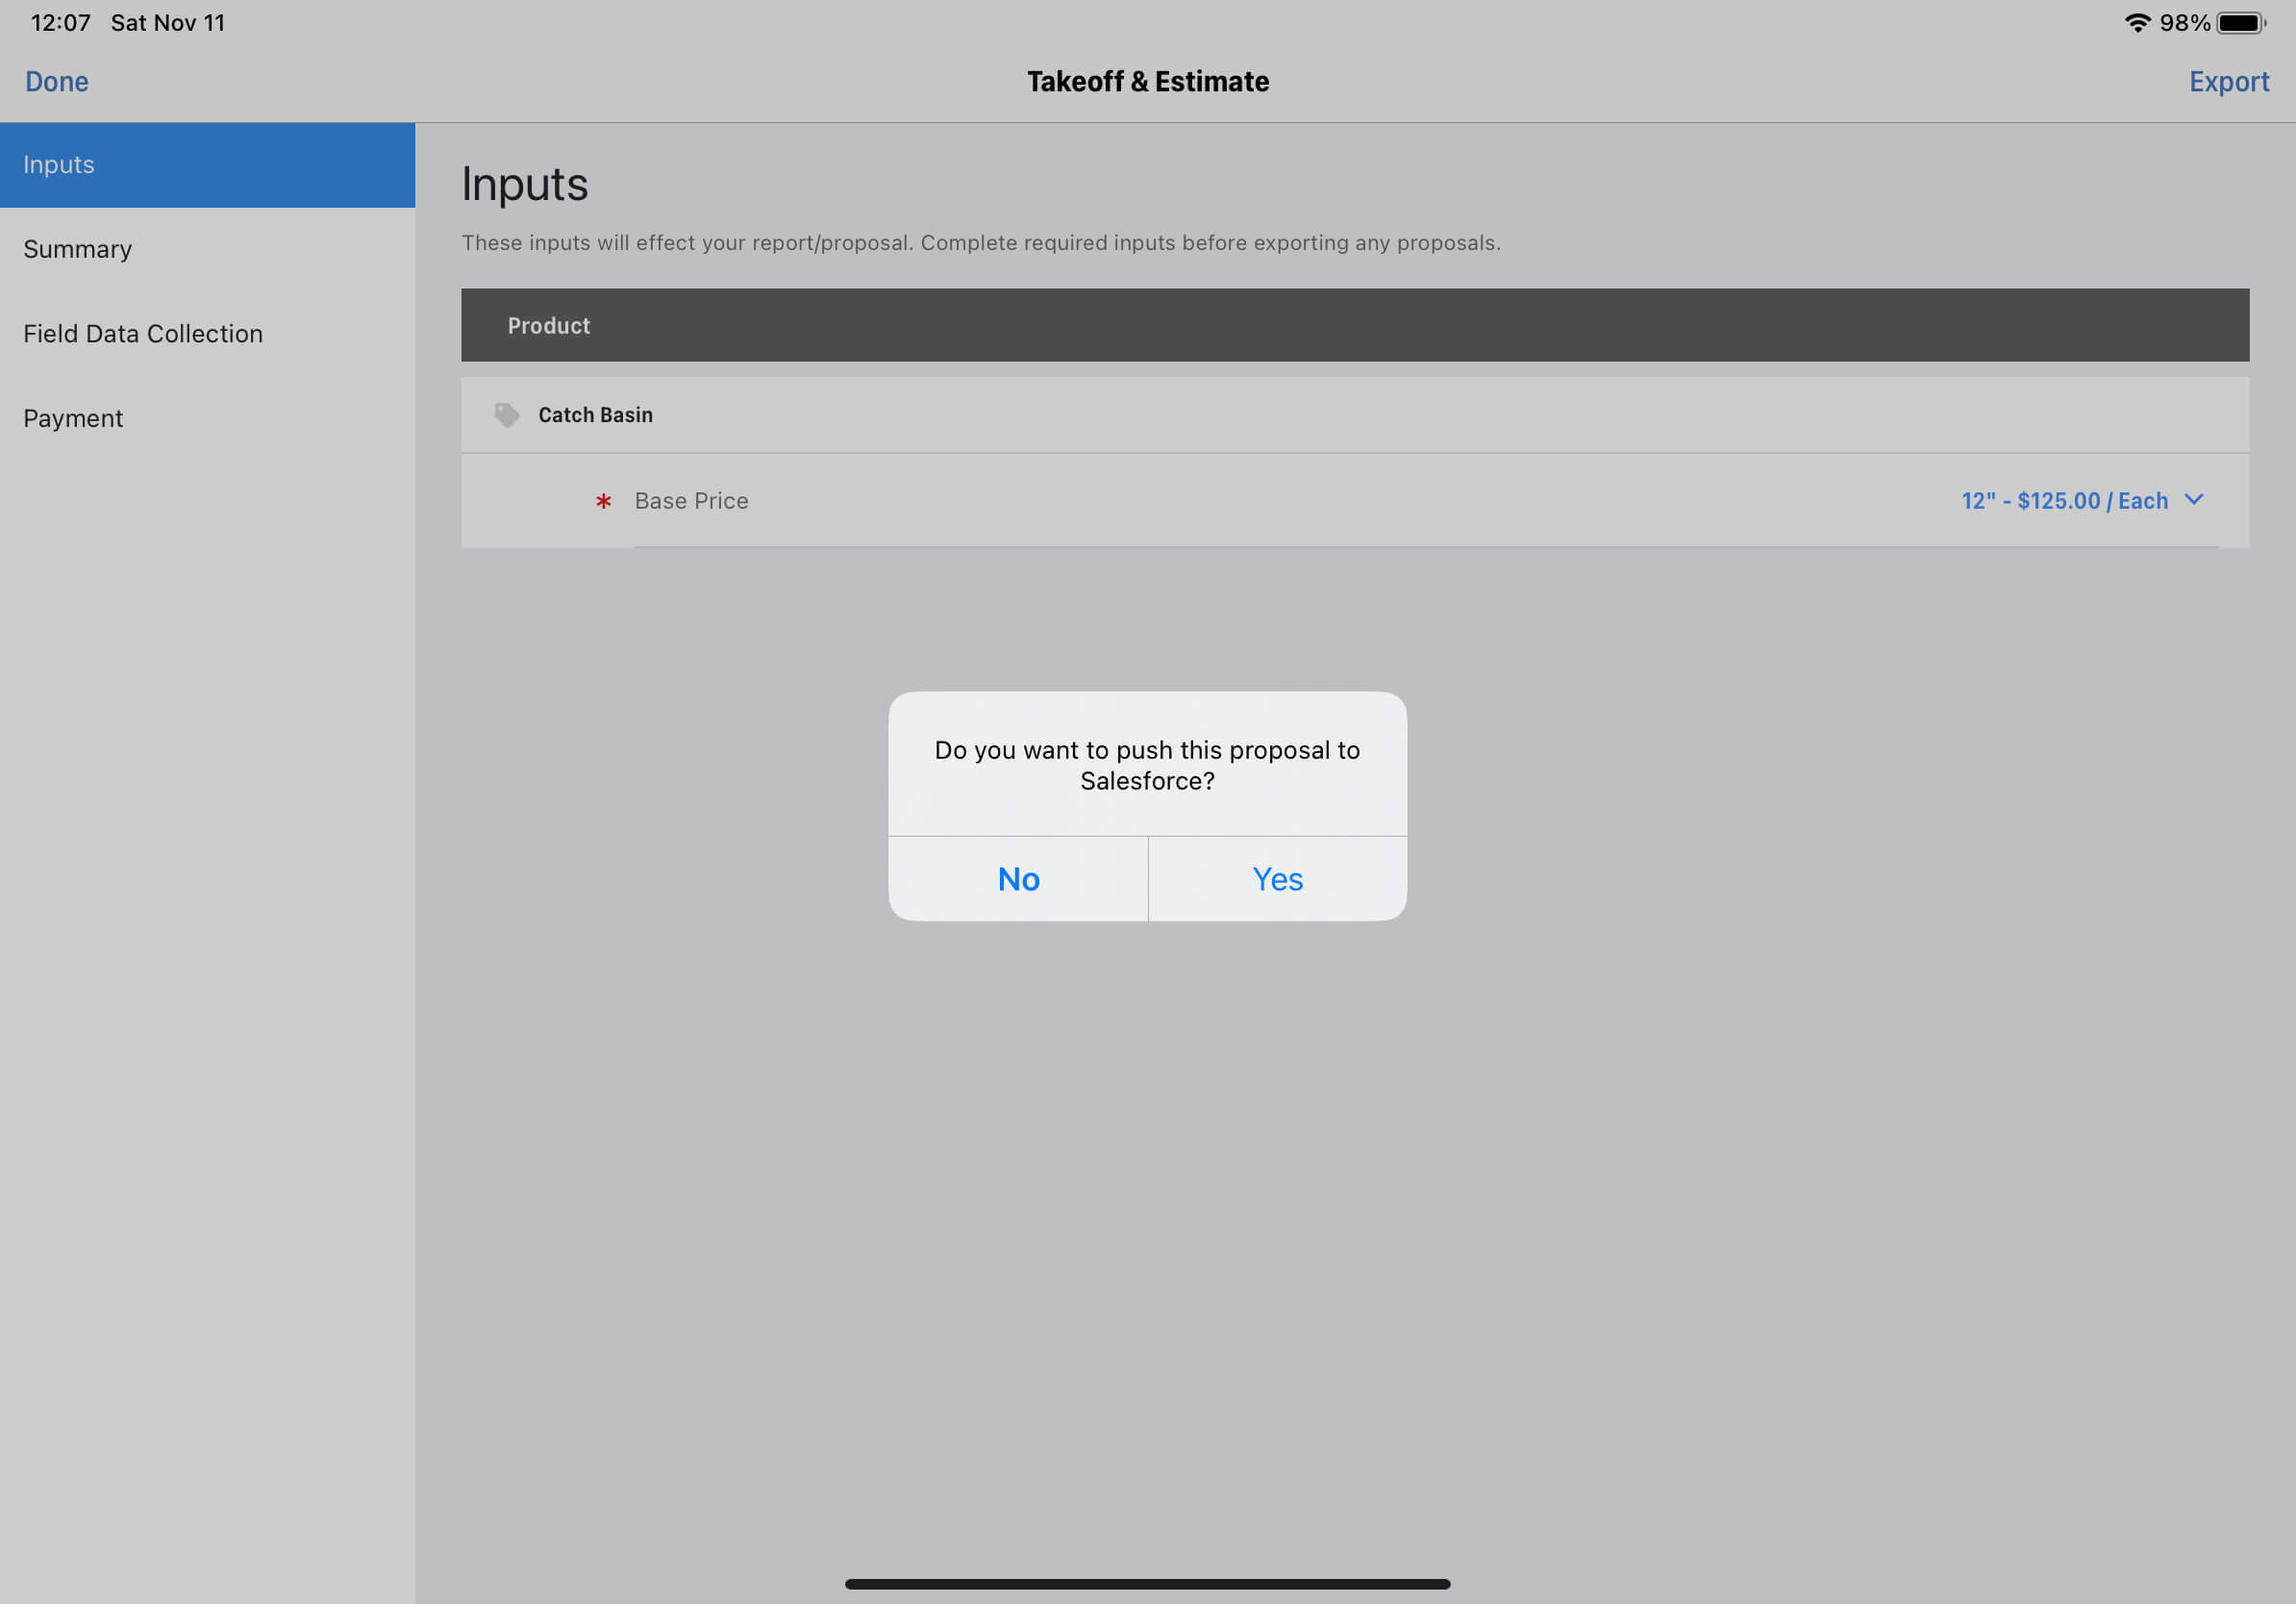
- When user clicks the
- How It Works: The proposal PDF is exported and pushing to Salesforce, replacing any existing files.
- How to Verify: Check these files in the Attachments section of the associated Salesforce Opportunity.
Manual Push for Line Items and Pricing
Section titled “Manual Push for Line Items and Pricing”-
When to push: Product line items and pricing will be triggered:
- When user clicks the
Exportbutton in the app, aDo you want to push this proposal to Salesforce?pop-up appears, if you select “Yes” it will trigger the push. - Alternatively, click
Send to Salesforcebutton in the Takeoff & Estimate Tab on the drawing detail page of the user site.
- When user clicks the
-
How It Works: ArcSite pushes the corresponding drawing line items data to OpportunityLineItems of the Salesforce opportunity.
-
How to Verify: Check the Products in the corresponding Salesforce opportunity.
Webhooks and APIs for Salesforce Customization
Section titled “Webhooks and APIs for Salesforce Customization”If you need more customized features, ArcSite’s Extended Integration offers specialized Webhooks and APIs for Salesforce.
- Adding Proposal Exported in App webhook in user site admin page for custom developments.
- Using the Connected Salesforce Product API to fetch the connected Salesforce Product2 ID from ArcSite Product ID.
Customization Examples:
Section titled “Customization Examples:”Create a Quote when you don’t sell the project
Section titled “Create a Quote when you don’t sell the project”Let’s say you’ve edited a Drawing and want to auto-generate Salesforce Quote when you select “No” in “Do you want to push this proposal to Salesforce?” pop-up.
Implementation Steps:
payload = get_payload_from_webhook() if payload.yes_no is False # extract drawing_id and salesforce object data from payload drawing_id = payload.drawing_id salesforce_object_type = payload.salesforce_object_type salesforce_object_id = payload.salesforce_object_id # Fetch all Line Items info using drawing_id line_items = request_arcsite_drawing_line_items_api(drawing_id) # Generate Salesforce Quote # Create Salesforce QuoteLineItems else # Do nothing, arcsite will push line items data.- Complete Basic Integration and subscribe to the Proposal Exported in App Webhook.
- ArcSite sends payload data to your webhook URL. You should to extract the
yes_nofrom the payload and handle the logic like the sample code right side. - Extract
drawing_idandsalesforce_object_typeandsalesforce_object_idfrom the payload. - Fetch all Line items info using the
drawing_idvia Drawing Line Items API. - Generate an Salesforce Quote Object
-
Name: Use the Drawing Name as the Quote’s Name.
-
TotalPrice: Use the
totalfrom the returned data as theTotalof Quote. -
Tax: Use sum of
taxfrom returned data as theTaxof Quote. -
Discount: Use sum of
discountfrom returned data as theDiscountof Quote.6.Create Salesforce QuoteLineItems
-
QuoteId: Use the created Quote’s ID as the
QuoteIdof QuoteLineItem. -
Quantity: Line item’s
Quantity -
Unit Price: Use line item’s
total/quantityas theUnitPriceof QuoteLineItem. -
PricebookEntryId: Fetch connected Salesforce Product2 ID using the Line Item’s
product_idvia Connected Salesforce Product, then use the returned Product2 ID to fetch thePricebookEntryIdof QuoteLineItem.
APIs for Salesforce
Section titled “APIs for Salesforce”Associate Salesforce Opportunity with ArcSite Project
Section titled “Associate Salesforce Opportunity with ArcSite Project”curl -X POST 'https://api.arcsite.com/v1/salesforce/associate_project' \-H 'Authorization: Bearer your_api_token_here' \-H 'Content-Type: application/json' \-d '{ "salesforce_object_type": "Opportunity", "salesforce_object_id": "0062v00001J8Z3aAAF", "project_id": "36029621653386360"}'const response = await fetch("https://api.arcsite.com/v1/salesforce/associate_project", { method: "POST", headers: { Authorization: "Bearer your_api_token_here", "Content-Type": "application/json", }, body: JSON.stringify({ salesforce_object_type: "Opportunity", salesforce_object_id: "0062v00001J8Z3aAAF", project_id: "36029621653386360", }),});const data = await response.json();import requests
response = requests.post( "https://api.arcsite.com/v1/salesforce/associate_project", headers={"Authorization": "Bearer your_api_token_here"}, json={ "salesforce_object_type": "Opportunity", "salesforce_object_id": "0062v00001J8Z3aAAF", "project_id": "36029621653386360", },)data = response.json(){ "id": "36029621653386360", "name": "nac", "created_at": "2022-01-16T03:31:39", "updated_at": "2022-01-16T03:31:39", "job_number": "heeloo", "customer": { "name": "hello", "phone": "122112", "second_phone": "122112", "email": "dev@arctuition.com", "second_email": "dev@arctuition.com", "address": { "street": "address", "city": "city", "county": "county", "state": "state", "zip_code": "200544" } }, "work_site_address": { "street": "street", "city": "city", "county": "county", "state": "state", "zip_code": "300433" }, "sales_rep": { "name": "Wang", "email": "dev@arctuition.com", "phone": "122112" }, "tags": ["tag1", "tag2"]}This endpoint establishes an association between a Salesforce object and an existing ArcSite project.
POST https://api.arcsite.com/v1/salesforce/associate_project
Parameters
Section titled “Parameters”| Parameter | Type | Description |
|---|---|---|
| salesforce_object_type | String | (required) The type of the Object in Salesforce, the value should one of Opportunity and Quote. |
| salesforce_object_id | String | (required) The ID of the object in Salesforce. |
| project_id | Int | (required) The ID of the existing ArcSite project. |
Connected Salesforce Product
Section titled “Connected Salesforce Product”In ArcSite, after setting up the Salesforce environment, you can connect a salesforce Product2 to an ArcSite product within the ArcSite website.
To retrieve the connected Salesforce Product2 ID using an ArcSite product ID, you can utilize this API:
curl 'https://api.arcsite.com/v1/salesforce/connected_product/<arcsite_product_id>' \-H 'Authorization: Bearer your_api_token_here'const response = await fetch("https://api.arcsite.com/v1/salesforce/connected_product/<arcsite_product_id>", { headers: { Authorization: "Bearer your_api_token_here", },});const data = await response.json();import requests
response = requests.get( "https://api.arcsite.com/v1/salesforce/connected_product/<arcsite_product_id>", headers={"Authorization": "Bearer your_api_token_here"},)data = response.json(){ "connected_product_id": "AXh09668400GJgk"}This endpoint provides the connected Salesforce Product2 ID.
POST https://api.arcsite.com/v1/salesforce/connected_product/<arcsite_product_id>
Webhooks for Salesforce
Section titled “Webhooks for Salesforce”Prompt after exporting proposal in App for Salesforce
Section titled “Prompt after exporting proposal in App for Salesforce”This webhook is triggered after exporting a Proposal PDF in the ArcSite App and the user chooses “Yes” or “No” when prompted.
This webhook will only be triggered if:
- The project is associated with a salesforce opportunity.
- This webhook has been added.
- And the user exports a proposal PDF in the app.
- The user choose the “Yes” or “No” in the app when prompted.
Prompt after exporting proposal in App Webhook Payload
Section titled “Prompt after exporting proposal in App Webhook Payload”| Parameter | Type | Description |
|---|---|---|
| project_id | String | (required) The project id of the project |
| drawing_id | String | (required) The drawing of the project |
| salesforce_object_type | String | (required) The type of the Object in Salesforce, the value should one of Opportunity and Quote. |
| salesforce_object_id | String | (required) The associated salesforce object id |
| yes_no | Boolean | (required) User Selection |